Inspirations

Inspirations
The color you see is the color you get!

Wednesday, August 31, 2011

Vintage brown tag - Kianel

Hello friends!
Kianel here with you today to show you a monochromatic vintage tag using the following Creative Inspirations paints: "autumn wheat" "fairy dust" "tan" "chocolate" and "gold".
Close up of the colouring of the stamp:


The clustering, really shimmery!

Well, i wish you all a great week and don't forget to check our last challenge which is about "lots of layers". Love from France, Kianel.

Tuesday, August 30, 2011

A Sympathy Card

Good morning everyone. Carole here. I hope you have all survived the earthquakes and hurricane unscathed. I have a card to share today that was made for a close friend whose husband passed away on Thursday after a hard-fought battle with cancer.

When I was choosing colours for my card, I realized that I didn't have the colour I wanted for my flowers, so I mixed Blush and Pumpkin to get a colour that more closely matched my patterned paper. Peach might have done quite nicely, but I don't have it, and anyway, it's fun to mix colours and see what you come up with. It makes your Creative Inspirations Paints that much more versatile.
I also used a hint of Sunshine for the pistol & stamens, as well as Mint for the leaves and stems. There is just enough shimmer to add elegance without overwhelming a sympathy card.

Monday, August 29, 2011


Hello friends. Beth Norman here with today's post. As I type this I'm enjoying the cooler temperatures that we see here South Western Ontario, Canada. I'm preposting as I'm heading down to visit my mom in Georgia who says to expect 90 degree weather. Not sure if I'm up to more hot weather, but I'll take whatever I can get--I guess.

My card uses the Faded Texture background from the Technique Junkie Newsletter.

The colours of CI paints I used are:
Lavender
Sky Blue Plum
Rose Quartz

Sunday, August 28, 2011

CI Paints Inspired By: Lots of Layers


Thanks to all those who joined in last week and shared their "Clean and Simple" creations!

Just a reminder that this is the last challenge of the month!  Next week we will be drawing a winner from all the August entries to win some paints of your own! 

---------------------------------------------

Each week you will be given a challenge to find inspiration in/from what ever the challenge theme is... you can be as literal or abstract in your inspiration as you want....Just make sure you can tie it back to the theme! Challenge closes at 4:00pm Eastern on Saturday.

You will always be able to jump back to the current challenge by clicking the "Current Challenge" link in our sidebar. The rules can always be found by clicking the tab "Challenge Rules" at the top of the page.

You do not need to use the Creative Inspirations Paints in your project, however, if you do, tell us which colors you used, and your name will go in the drawing twice! Each month, one person will win 5 jars of paint in the colors of their choice. The winner will be randomly drawn from all the people who have played that month, so make sure to join in on our challenges each week!

---------------------------------------------

This week's challenge is:

Inspired By: Lots of Layers

 
Here's a card for some inspiration:
10 Layers of paper!!


I used CI Paint "Blue Ice" to add shimmer to the cross.

Have a great week!

Kendra

---------------------------------------


Inspired By: C.A.S Random.org Top 3

Thanks to those who joined us last week for our "Clean and Simple" challenge!  What some great projects!
Here are the Random.org Top 3 Picks:

[DSC037755.jpg]

Beautiful work ladies!

You each will recieve an extra entry in our August drawing for some CI Paints of your own!

You can grab this badge for your blog:

Saturday, August 27, 2011

got dark?

 Hey everyone!

So are you all ready for yet another fabulous way to incorporate Creative Inspirations Paint into your world of crafting?

This past week I have been working on a Halloween themed mini album.  I have some black chipboard that I have been using for the pages.  I realized that I have rarely used CI paints on a dark background, and I don't see it done very often. So I thought I would take a little time to play with that train of thought on my mini album.

Now, you CAN use the CI paints on dark backgrounds, and when the design hits the light it is FAB! However, if the light isn't shining on it, you may notice that some of the colors tend to disappear.  For my mini album's cover, I wanted to see the image no matter the lighting.  

Here is what I ended up doing...

What you need:

Creative Inspirations Paint 
Light colored pigment ink
Makeup sponge
Stamp
Dark background 

Step 1: Ink up your stamp with your light pigment ink. Here I am using white, but other colors work too. 

*using pigment ink is important... it will stay wet longer to allow you time to work, and it is more opaque so it shows up on dark backgrounds.*

 Step 2: Using a makeup wedge, sponge on CI paint over the ink. (it doesn't need to be real thick, but the more paint you use, the more the shimmer shows.

Step 3: Stamp as you normally would. 

I know it is hard to really see in the photo, but I promise in real life you can still see the shimmer when the light hits it!  The color is much more subtle, but the color shows through too. (I used Antique Gold, so you can't see the color well, but when I did it with purple, it was more visible)

Here's the cover for my Halloween mini album... I'm having so much fun with it!

Enjoy!
~Kassi

Friday, August 26, 2011

clean up act...

Hey everyone!

I'm here again with another quick tip...

If you are a stamper, or if you read the tutorials I do each week, you are probably familiar with clear acrylic blocks... If your's are anything like mine... they get dirty quick!
I've got pigment ink, stazon, and dried Creative Inspirations paint on this baby... Although it does look lovely all CI sparkly, it bugs me to have dirty blocks!


Now I realize I am kinda OCD when it comes to keeping things clean, but in this case there is a good reason. When your blocks get this dirty, not only is it hard to see where you are stamping, it can actually keep your stamps from sticking to the block. 

So... my simple solution?

Instant anti-bactireal hand gel. It cuts through the ink and the dried paint. It is fabulous! Never worry about paint drying on your blocks again. =)

Enjoy!
~Kassi

Thursday, August 25, 2011

Thank You

Clean and Simple is our inspiration this week.  I always have problems trying to keep it simple; seems I just want to keep adding things, LOL  

For this card, I used one of my new adorable Whoopsi Daisy stamps.   She is digitally paper pieced.  The card is embossed and then I added 3 K&Co flowers and a stitched ribbon.

 I used the Spellbinders Parisian Accents border die and painted it with 'Rose Quartz" CI Paint and then stamped 'Thank You'.

Thanks for sharing your clean and simple cards.  I'm always inspired when I visit everyone's blogs.  Have a great day!


Wednesday, August 24, 2011

Clean & Simply Inspired


Hello!!!! I hope your Wednesday is off the a beautiful start!! Today's card was clean and simply inspired by this week's Creative Inspirations Paint Challenge:o) A long while back...I won't share exactly how long back, but it was before embossing folders hit the market...YIKES...I purchased a set of DCWV embossed cards. Really, I couldn't pass it up...I have a weakness for a good sale! You heard of the Frugal Gourmet...well, I am his long, lost sister the Frugal Papercrafter;o) So, when I saw this week's Clean and Simple Challenge, I knew where to start...time to dust off those embossed cards and get busy.

The darling image I chose is Hydrangea Hugs by Elisabeth Bell for SCACD Stamp Co. Isn't she a doll baby? I thought this precious image would be the perfect accompaniment with the embossed baby card. I colored the image with Prismacolor markers...added teeny dots to the centers of each hydrangea blossom with my Viva Decor Pearl Pen (White)...and the bow received a dusting of Fairy Dust Creative Inspirations Paint. Actually, there is some Fairy Dust sprinkled in the hydrangea centers too...but my camera didn't capture the shimmer very well. Don't you love how I blamed the camera...it couldn't be me...the unskilled photographer could it? ;o) I used my large circle Nestabilities to cut out my image, then hand-stitched the circle to a doily I colored purple...and the purples are really much closer to the same color in real life...again, it's all my camera's fault hehehe. I'll also let you in on a little secret...I used a stencil from Crafter's Workshop (Mini Dots All Around) as my piercing guide to do the stitching. Finally, I added some flowers and pearl leaves to finish it off. Yeppers! Easy peezy, lemon sqeezey!

I hope you will join us in this week's Creative Inspirations Paint Challenge!!! I am also thinking and praying for all my fellow East Coasters as Hurricane Irene approaches...please stay safe; and for all my friends in and around Virginia, I am praying and hoping all is well with you...we felt the aftershock of yesterday's earthquake and we live hours away. I can only imagine what it felt like for those of you living right there.

Blessings and Hugs!!
Carolyn

Tuesday, August 23, 2011

Believe in Magic

This week the challenge is Clean and Simple, so I decided to try my hand at a CAS card. I usually have a problem with CAS, so I hope this works for you.  I created the background by sponging three colors of CI paints -- sea foam, bright yellow, and amethyst -- across the panel. It looks like a rainbow, don't you think. I then stamped the unicorn (Scrollworks [no longer in business]) and the sentiment (Club Scrap). The sparkle of the paint really creates a feeling of magic. I could have stopped there and adhered the panel to the card base, but I had to add the punched corners and metallic inspirations to finish it off. Well, it was quick and almost CAS. Try your hand at the challenge. I can't wait to see what you come up with. Barbara Washington -- designer.

Monday, August 22, 2011

For the Birds

Good morning!  This is Kendra, my post today isn't a project from me, but rather my creative little guy who loves crafting with me.  Thought I would share something a little different and fun that we did together this summer!

My little guy LOVES being outside helping me in my flower beds and feeding the birds!  For part of his birthday gift, his great-grandparents gave him a birdhouse.  He was so excited!  My aunt mentioned that he should paint it!

Well you don't tell a 3year old that as they don't forget much, which is okay!  So he has been on my case to paint it! So I got out a bunch of paints and just let him go to town!


He had so much fun!  He kept telling me, "This is going to be so pretty!  The birds are going to love it!  They're going to have lots of babies in it!" lol Too cute!

He decided to leave it dry and asked me, "Mommy, it would look really pretty with your special paints!" Referring to my Creative Inspirations Paints!  He always enjoys watching me craft with them.  And went on to say, "I'll be careful and just use a little."  How could I say no?!?!

So I decided to let him use a few of them to add his own shimmer to the birdhouse, he was so happy!
 Just look at the shimmer!!!  I let him use Fairy Dust, Buttercup, Rose Quartz, Royal Purple, Turquoise and Mango.

Finished Birhouse:

All proud of his creation!

My husband then sealed it for us, so that he could hang it outside! It sure is shimmery when the sun shines on it!


Hanging up in the tree, waiting for a bird!
You can see right where he used the CI Paints here on the front side!  So shimmery!!

Hope you have enjoyed this post today, have a nice day!

Kendra & Sawyer

Sunday, August 21, 2011

CI Paints Inspired By: C.A.S.


Thanks to all those who joined in last week and shared their "Orange and Pink" creations!

---------------------------------------------

Each week you will be given a challenge to find inspiration in/from what ever the challenge theme is... you can be as literal or abstract in your inspiration as you want....Just make sure you can tie it back to the theme! Challenge closes at 4:00pm Eastern on Saturday.

You will always be able to jump back to the current challenge by clicking the "Current Challenge" link in our sidebar. The rules can always be found by clicking the tab "Challenge Rules" at the top of the page.

You do not need to use the Creative Inspirations Paints in your project, however, if you do, tell us which colors you used, and your name will go in the drawing twice! Each month, one person will win 5 jars of paint in the colors of their choice. The winner will be randomly drawn from all the people who have played that month, so make sure to join in on our challenges each week!

---------------------------------------------

This week's challenge is:

Inspired By: C.A.S.
(Clean and Simple)


Here's a card for some inspiration:

I used CI Paint "Fairy Dust" to cover the frame.  I also used some clear hot fix gems!

Have a great week!

Kendra

---------------------------------------


Inspired By: Orange & Pink Random.org Top 3

Thanks to those who joined us last week for our "Orange and Pink" challenge!  Those were fun colors to work with!

Here are the Random.org Top 3 Picks:


Beautiful work ladies!

You each will recieve an extra entry in our August drawing for some CI Paints of your own!

You can grab this badge for your blog:

Saturday, August 20, 2011

blended beauty...

Hey everyone!

Welcome back to another Saturday tutorial! Today I want to share a simple technique that gives fabulous results on a variety of surfaces. This is blending made easy!

What you need:
2 Creative Inspirations Paint colors *
Flat paint brush
Non-porus work surface

*I know it looks like I'm going camo with the brown and green, but it photographs well. =)  I often use a dark and light paint of the same color for this technique... like Denium and Tanzanite.


 Step 1: To avoid contaminating your jars of paint, put a glob of both colors of CI paint on your non-porus surface. (this can be a non-stick craft sheet, acrylic block, piece of glass... you get the idea)


 Step 2: Dip one corner of your flat brush in the first color and the other corner in your second color.

 Step 3: Do a few brush strokes back and forth on the non-porus surface to blend the colors in the middle. Pick up more paint if they aren't meeting in the middle. 

 Step 4: Paint!

Reload your brush as needed by repeating steps 1-3.

So, where are some places to use this technique?
I'll get you started with just a few...

 Ribbon!
Make sure your ribbon is wet when you paint it.. it helps the colors blend more smoothly.
*Burnt Sienna, Evergreen*
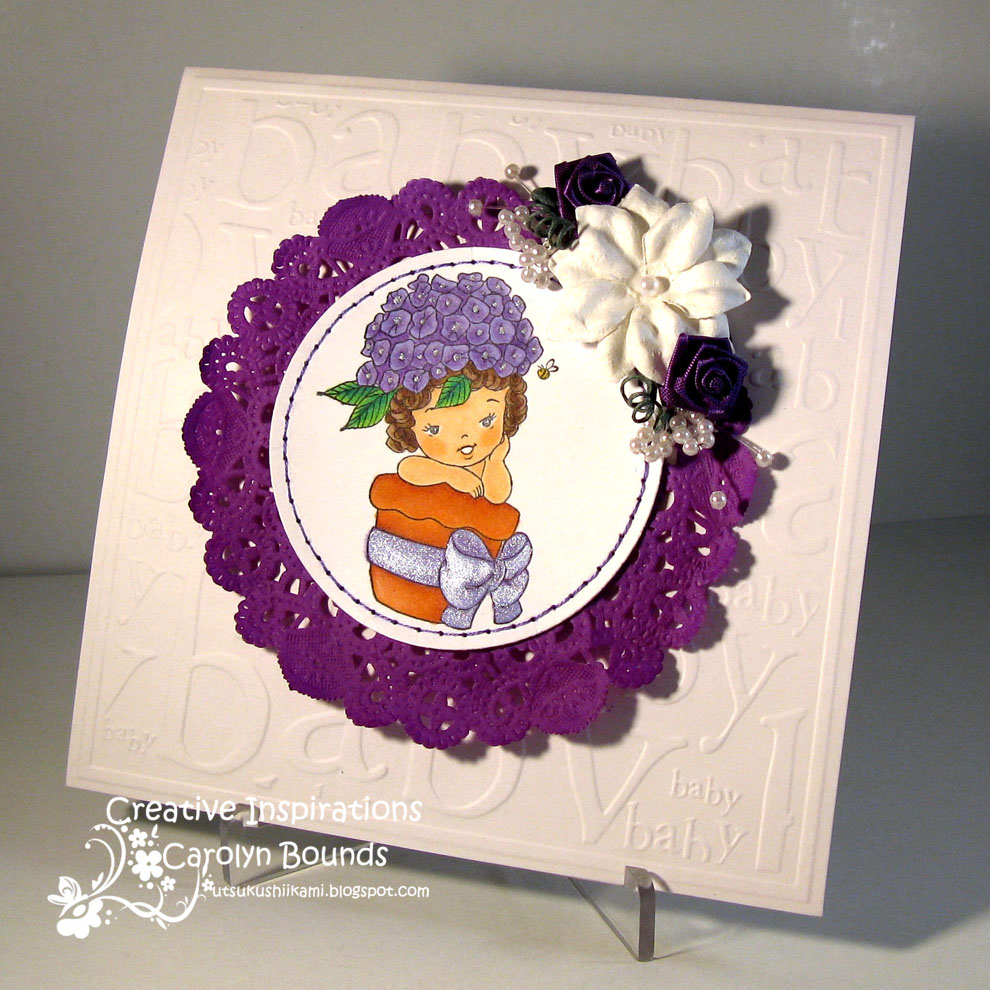
 Flowers!
For a more natural look on the flowers, I usually don't brush straight across like I did on the ribbon. Instead, I work in small zigzags. I also used a larger brush
*Winter Frost, Tanzanite*

 Clay embellishments!
Again, zigzags give a more natural feel.
*Coal, Silver Frost*

On this layout, I painted the shells using Carmel and Mocha Latte. They fade beautifully from dark to light, just like the shells we found on the beach (except sparklier!).

And these are just a few ideas to get you started! 

Enjoy!

*For more info on the completed lo, visit my blog.

Friday, August 19, 2011

a little gloss...

Hey everyone! 
Ready for another quick tip?  

For extra shine and dimension, apply a layer of Glossy Accents (by Ranger) over your painted areas.  The result looks fabulous, and it seems to really accentuate the sparkle of the Creative Inspirations Paint!
Doesn't that just look yummy! =)

Enjoy!

Thursday, August 18, 2011

Venetian Carnivale Mask

Good morning! I have a very different kind of project to share with you today. I happened to be browsing around one day and I saw a gorgeous project with a mask on Linda Duke's blog. To be honest, I don't remember what the rest of it looked like - I just remember the mask. It just stuck in my brain and I had to sit down and create something with it.


I used the Antique Glimmers technique from Technique Junkies on the mask, and then I used Antique Silver Creative Inspirations Paint around the edges of the mask as well as inside the eyes. While I had the silver paint out, I used it to paint a bamboo skewer - that is the handle of the mask. Instead of stamping on the mask, I added rows of pearls around the eyes so you can see the wonderful shimmer on the mask.


I hand-dyed the seam binding with various purple inks, and then I attached the ribbon to the silver handle along with some silver cord. A Wild Orchid flower from I Brake for Stamps is at the top of the handle. The sentiment is also from I Brake for Stamps.

I hope you enjoyed my little burst of creativity today. Why not break out of your comfortable stamping norm and try something different? :-)


Stamps: Dream from I Brake for Stamps
Ink: Jet Black Stazon, Dusty Concord, Lavender, Walnut, Tea Dye, Antique Linen
CS: Eggplant, White, Fairy Flora (Prima), Victoria Gardens (Echo Park)
Other: Wild Orchid flower from I Brake for Stamps, pearls, bamboo skewer, paintbrush, sponge, seam binding, silver cord, Delphinium Glimmer Mist, Labels 14 die, oval die
Creative Inspirations Paint: Antique Silver
TJ Technique: Antique Glimmers

Wednesday, August 17, 2011

Vintage box with bird cage - Kianel

Hello CI lovers!
Kianel here with you today to show you a box i made using matches boxes. I also made a small bird cage out of dies to decorate the top of the box. I decided to put my Maggies away for a while and grabbed my stamps from Katzelkraft. Here i used quite a lot of CI paint , covering all my paper structures and all my embellishments with paint, colouring my stamps with a mix of distress + water + CI paint. Ci paints i used are "mocha latte" "seafoam" and "autumn wheat". More pictures and details on my blog.


I hope that you will like it and don't forget our challenge every sunday to get a chance to win those terrific CI paints! You'll also see some amazing creations from my DT mates everyday and Kassi will give you really good tips every saturday! Love from France, Kianel.

Tuesday, August 16, 2011

My Inspirational Journal

Hey everyone. Carole here today. As some of you know, my family has had a very difficult summer. I decided that I needed to put everything I've been feeling into some art. This page is one I've made that I can look at when I'm feeling particularly down and need a little help remembering that it does get better.Paints I used are Fairy Dust, Aqua Marine, Garnet, Rose Quartz and Tutu Pink.

Have a great day!!

Monday, August 15, 2011


Yes, it's time for another post by me, Beth Norman.
This stamp, from I Brake for Stamps, is one of my favourite stamps. I paired my painted image with the Aged Tile technique from the Technique Junkie Newsletter.

Paints I used are:

Lavender
Plum
Pumpkin
Spring Green
Garnet
Turquoise

Thanks for stopping by today!