Inspirations

Inspirations
The color you see is the color you get!

Sunday, August 14, 2011

CI Paints Inspired By: Orange and Pink


Thanks to all those who joined in last week and shared their "Inspired By: A Tutorial" creations!

---------------------------------------------

Each week you will be given a challenge to find inspiration in/from what ever the challenge theme is... you can be as literal or abstract in your inspiration as you want....Just make sure you can tie it back to the theme! Challenge closes at 4:00pm Eastern on Saturday.

You will always be able to jump back to the current challenge by clicking the "Current Challenge" link in our sidebar. The rules can always be found by clicking the tab "Challenge Rules" at the top of the page.

You do not need to use the Creative Inspirations Paints in your project, however, if you do, tell us which colors you used, and your name will go in the drawing twice! Each month, one person will win 5 jars of paint in the colors of their choice. The winner will be randomly drawn from all the people who have played that month, so make sure to join in on our challenges each week!

---------------------------------------------

This week's challenge is:

Inspired By: Orange + Pink

 
Lets see some orange and pink on your creations, it can be a lot or even just a little!

Here's a card for some inspiration:


I used some CI Paint to add shimmer to some of the butterfly!
Have a great week!

Kendra

---------------------------------------


Inspired By: A Tutorial Random.org Top 3

Thanks to those who joined us last week for our "Tutorial" challenge! 

Here are the Random.org Top 3 Picks:

Beautiful work ladies!

You each will recieve an extra entry in our August drawing for some CI Paints of your own!

You can grab this badge for your blog:

Saturday, August 13, 2011

clearly distressed...

Hello everyone!  
If you remember, last week I showed you a fun way to paint acrylic embellishments... Well, today I'm going to show you how to distress your acrylic shapes. After all, who can know too many ways to embellish embellishments, huh! =)

What you need:
Acrylic/acetate die cut
Acrylic Paint
Creative Inspirations Paint
Flat Paint brush 

Step 1: Just like last week, the first step is choosing your acrylic shape. I die cut old clam shell packaging with a die cut machine, however there are many companies that make pre-cut acrylic shapes.

 Step 2: Dip a dry flat paintbrush into some acrylic paint. You don't want much on the brush. Randomly brush on thin layers of acrylic paint onto your shape. You want to make sure to leave empty spaces.  This is distressing, so keep it light, random, and just have fun with it!

*I am using white paint for this, but you can choose whatever color best fits your project.

 Step 3: After the acrylic paint has completely dried, use a flat paintbrush to randomly paint on some CI paint. Again, you don't want to cover every square inch of your piece, just randomly spread it on. Imperfection is perfect here!

*For a subtle look, choose an acrylic paint and a CI paint that are similar in color and intensity. For a bolder look, try using a light acrylic with a dark CI or the other way around.  Tons of options!

Flip it over and you are ready to use!

*hint 1: If you want more of the color and sparkle to show, try painting on the CI paint first, then using the acrylic paint second. Keep in mind that the moisture of the acrylic paint may reactivate your first layer of CI paint changing the color of your acrylic paint. 

*hint 2: if you aren't quite sure which way you want to layer your paint or which colors to use go ahead and try it out on a sheet of acetate transparency or clam shell packaging before painting your actual embellishment.

Here is a LO I did using this technique.

I used white acrylic paint and Silver Frost CI paint. Here's a close up so you can see it better.


Because the two paints are so similar in color, and Silver Frost is so light, it is hard to see in the photos, but it really adds beautiful streaks of shine through the piece!  You see more of the silver IRL.. between the acrylic's reflective nature and the shimmer of the paint, it is hard to really capture. 

Enjoy!
~Kassi

Friday, August 12, 2011

coffee clean up

Good Morning everyone!

Since no one in my house drinks coffee, you wouldn't think I would have many of these floating around....

Actually, I do. 

The reason?  They are a very inexpensive way to keep your work area clean. There is nothing worse than spending hours on a project then putting it down in a wet puddle of paint. Trust me. 

So here is my quick tip...

For all small embellishments, flowers, ribbons, etc. use coffee filters!  Just place your small item in and paint away. A little temporary adhesive on can help hold your item in place while you paint. When you are done, simply throw away the filter. 


This helps keep messes confined and makes clean up a breeze!

Happy painting!
~Kassi

Thursday, August 11, 2011

Vintage Domino Mini Book

This week we are being inspired by tutorials.  I love doing altered projects and so I wanted to try Kassi's awesome tutorial for dominos.  She used hers for a beautiful piece of jewelry but I decided to make a mini book with some vintage prints.


 I used CI Paint, 'Rustic Red' and 'Sea Foam' to coordinate with my paper.  I have found these colors to be beautiful 'vintage' colors. 

 Here you can see the wonderful shimmer of the paint.  'Gloria' was printed on acetate so the colors of the domino could show through.


Thanks so much for sharing tutorials that have inspired you!  Have an awesome day!


Wednesday, August 10, 2011

Pamper Yourself :)


Happy Hump Day!!!! I hope your week is going FABULOUSLY!!! :) Today, I have a simple card for ya using a new stamp I recently received from SCACD. I'm not really known as a girly-girl, but one "girly" thing I do is collect Blue Willow porcelain. I just love the clean and crisp look it adds to my kitchen and dining room...makes it feel so homey:) So, when I got my inky paws on this beautiful stamp, I knew I wanted to emulate my fave china by using a royal blue and white color palette.


The white portion of the perfume bottle was painted with Winter Frost Creative Inspirations Paint...wish you could see how beautifully it shimmers...unfortunately, the Diamond Glaze I added to it masks it in the photos:o( I also used Sapphire and Antique Gold Creative Inspirations Paint. I also sponged Sapphire Creative Inspirations Paint all over a white doily to further complement the card base and the image, as well as painting around the embossed edge of the circle in Antique Gold.


Like I said, it's a VERY simple card...but I thoroughly enjoyed creating it:) I hope your Wednesday is FABULOUS and the rest of your week holds even more pleasant happenings and smiles!!!

Hugs and Blessings!!!
Carolyn

Tuesday, August 9, 2011

Reverse Acetate Painting

This card uses one of my favorite techniques with Creative Inspirations paints. It's almost fail-proof and it's really easy. First, I started with a piece of acetate to fit the front of my card. For this card I cut a piece from an acetate box I had received some craft accessory in. Then I stamped my image using Stazon on the front side of the acetate. For this card I used the fuschia stamp from Heartfelt Creations. Once the ink  had a minute or two to dry and I flipped over the acetate to the reverse side. It was then time to paint the image. I used citrus, evergreen, sunshine, fuschia, plum and pink highlights for my image. The one thing to remember is that what you paint first is at the front of the finished image. I started by painting the shading of the flowers. Then I painted the other areas. One other tip is that I find that I get a better look if I dab on the paint rather than stroke. Once the image was painted and dry, I could flip it back over and use it on my card. For this card I used the lace die from Heartfelt Creations. Often I will use a dry embossed panel, but I thought the lacy die cut was perfect for the flowers. I adhered the lace die cut to a lighter green panel and attached the painted acetate to the panel with four gold brads. All layers were adhered to a darker green card base. The Happy Birthday sentiment is an Outlines Sticker. It's my dd's birthday today. I hope she likes her card.
Barbara Washington - designer

Monday, August 8, 2011

Fun Card

Good morning!  Kendra, here with a card to share with you!

Our challenge this week is "Inspired By: A Tutorial".  I was really inspired by Kassi's "Bubble Painting" tutorial and had so much fun painting with the bubble wrap that I created yesterday's card and one more to share with you today!

A fun clean and simple card! 

And the shimmer....
I used CI Paints "Sky Blue", "Pumpkin" and "Canary"!

I'll be using this technique again!

Join in our challenge this week, we'd love to see what you create from a tutorial that has inspired you!


Sunday, August 7, 2011

CI Paints Inspired By: A Tutorial


Thanks to those who joined in last week and shared their take on our sketch!

---------------------------------------------

Each week you will be given a challenge to find inspiration in/from what ever the challenge theme is... you can be as literal or abstract in your inspiration as you want....Just make sure you can tie it back to the theme! Challenge closes at 4:00pm Eastern on Saturday.

You will always be able to jump back to the current challenge by clicking the "Current Challenge" link in our sidebar. The rules can always be found by clicking the tab "Challenge Rules" at the top of the page.

You do not need to use the Creative Inspirations Paints in your project, however, if you do, tell us which colors you used, and your name will go in the drawing twice! Each month, one person will win 5 jars of paint in the colors of their choice. The winner will be randomly drawn from all the people who have played that month, so make sure to join in on our challenges each week!

---------------------------------------------

This week's challenge is:

Inspired By: A Tutorial

 
Our very own, Kassi, posts tutorials every Saturday to inspire us all!  So I thought this would be a great challenge!  Has she or another DT member inspired you by a tutorial they've shared and you've been itching to try it?  Haven't gotten the time, well now is that time! (Or inspired by another tutorial you've seen somewhere...or have one to share?)

I was inspired awhile ago with her "Bubble Painting" tutorial.  I've been saving bubble wrapping and meaning to try it, but just haven't, well I am so glad I finally did!  It was so fun!

Here's my card:

Close-up of the bubble's and shimmer:
I used Creative Inspirations Paint "Blush" and "Tickled Pink" for this card!

I had so much fun with this technique, that I have another card to share tomorrow as well using it.

Remember we have a "Tutorial" tab at the top of the page with all the tutorials we have shared.

Have a great week!

Kendra

---------------------------------------


July Winner and Sketch Top 5

Thanks again to those that joined in our "Sketch" challenge last week and to everyone who joined our challenges in July! It's the first Sunday of the month, so do you know what that means?!?!  We have a winner to announce!!


CI Paints July Winner is..........


CONGRATS!!


If you can just send us an email with your mailing address, and the 5 colors you would like, we'll get your prize out to you: ci.shimmer.paint at gmail dot com

You're welcome to grab this badge for your blog:

------------------------------------------------------------------------

Love all the cards inspired by the sketch we shared!  We had 5 lovely entries, and I couldn't just use random.org to choose 3, I've decided to feature each of them! Thanks for joining in our challenge!

Here are the Top 5:


Beautiful work ladies!

You each recieved two extra entries in our July drawing.

You can grab this badge for your blog:

CONGRATS everyone! 

Saturday, August 6, 2011

clearly painted...

Hey everyone, I'm back with a spouncer tutorial as promised!

Today we are going to play with clear plastic! There are a lot of companies that make acrylic or acetate die cuts/mini albums... Any of them will work, or you can make your own. I like to keep the flat parts of clamshell packaging and die cut them. It's a great way to recycle!

What you need:
Acrylic or Acetate die cuts
Creative Inspirations Paint
Paint Brush
Spouncer (or makeup wedge) 

 Step 1: choose your acrylic/acetate die cuts, or make your own.

 Step 2: brush on a light layer of CI paint with a paintbrush. It will look streaked, splotchy, and horrid right now, but it will help the next coat stick. 

 Step 3: Using the spouncer I told you about yesterday, pounce on a second coat of CI paint. This coat should cover well.

 Using the spouncer does two things for us here... 1) puts on a nice thick coat of paint without leaving the streak marks a paint brush tends to leave on slick surfaces, and 2) leaves a fantastic texture!!!

*if you don't have a spouncer, use a makeup wedge. Pouncing on non-porous surfaces will give you the most even coat. 


 The spouncer (or makeup wedge) makes adding CI paint to the edges easy!

*note: I didn't pounce on the Mango paint, I brushed it on. I'll enlarge it so you can see the detail better.

Can you see how streaked it its compared to black parts I did above?  I did this intentionally because I wanted the brush marks on this part of the wings.... I just kept in mind that I would see them and made their directionality part of the design. 

Your piece is now ready to use!

 Here are a couple tips for you:
1) use a clear liquid adhesive made for non porous surfaces (like Glossy Accents by Ranger) to adhere your acrylic pieces to your projects.

2) make the painted side the BACK of the project (so the glue would go on the same side as the paint). Why? Well, because the paint has nothing to sink into, so it can and will scratch off. By placing the paint underneath, you protect it. Your color and sparkle will still show and seem to be encased in glass.

3) try putting your painted acrylic piece over different colors/patterned papers... because you can still see through your piece somewhat, you can get some really interesting effects!

Enjoy!

Friday, August 5, 2011

spouncer it...

Hey everyone!
I'm here with another fabulous tip... or rather a fabulous tool!  The best part.... these are CHEAP! LOL!

I'm always looking for new ways to use the Creative Inspirations paints, and that also includes tools! One of my new faves is this Spouncer by Plaid.

These are little round sponge pouncers on a stick. (ok, so they look more like gumdrops on a stick, but maybe that's just cuz I'm hungry...)  They come in various sizes, which is nice. I picked up a variety pack of 8 at a big name craft store for under $5. They are usually found with the paints and wall stencils. AND, they are reusable! (ok, so they are meant to be disposable, by why waste a good thing?)

So, why do I like them?  Well, they are a great way to get a soft speckled texture as well as a denser coverage, and everything in between!  They make getting a distressed edge with the fabulous CI sparkle a breeze!

When you are done, simply wash out with plain water, squeeze extra water out, and let dry. EASY!

*HINT: it really doesn't take much paint to load these up... Just put a little CI paint on the inside of your lid and pounce into it. The less paint you have on your sponge, the softer the effect. Too much paint will end up in strong circles.... which would work too if that's what you want!*
I'll be sharing another fun way to use these Spouncers tomorrow, so be sure to pick some up, and join me tomorrow for some spouncin' fun!

Enjoy!
~Kassi

Thursday, August 4, 2011

Food of Love


Howdy - it's Holly posting today from Texas. Amazingly enough, I haven't melted from this record-breaking heat - YET! LOL I'm still here and still making cards to share with y'all!

When I went to a shoebox swap back in May, my sweet friend Tex (hi, Bev!!!) and I had some leftover bags with the card parts ready to go. I asked her if I could steal a few of them and she practically shoved them at me. LOL I gave her some of my bags for an even trade.

All I had to do was stamp something on this and glue the pieces down - so perfect for those days when you just don't have much time. I picked out a little flourish/swirly stamp and stamped it on each side of the white cardstock piece, and then I stamped the sentiment in the center.

Do you remember this "Getting Highlights" technique that Kassi did a few months ago? I used that technique by sponging some Blue Ice Creative Inspirations Paint on the embossed areas in the background. I didn't have that exact same tool that Kassi used. I actually used a Colorbox stylus, and it worked out great. It's so shimmery and sparkly!

I hope you are staying cool and hydrated in this hot weather. Have a wonderful day!

Creative Inspirations Paint: Blue Ice
Stamps: Chapel Road - Inchy Designs and a drama/theater set
Ink: Tumbled Glass, Tuxedo Black Memento
CS: Cool Caribbean, white, black
Other: sponge, Labels 4 die, Tim Holtz flourishes embossing folder

Wednesday, August 3, 2011

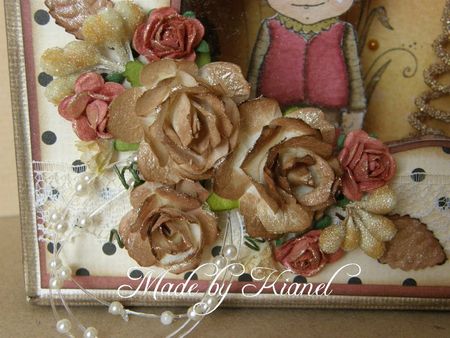
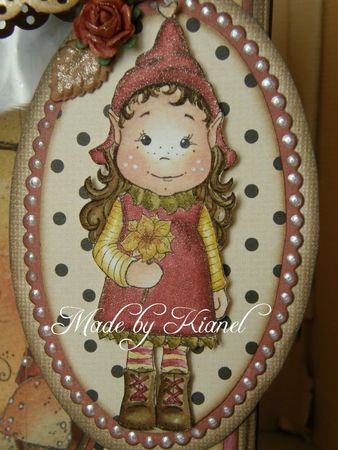
Fairy box - Magnolia Ink - Kianel

Hello CI lovers!
Kianel here with you today to show you a fairy box i made for the last Magnolia Ink magazine. I used like tons of CI paints on that project. Please take a look at my blog to see more pictures.

Here is the box open:
P4110775
I used Creative Inspirations paints to add shimmer to all my embellishments and decorations.
P4110706
   
P4110707

Material used for this box:
- papers: Bazzill + Canson+ MME+ Teresa Collins
- stamps: no less than 11 Magnolia stamps and the text is from Florilèges Designs
- colouring: Distress + shimmer paints "gold" "winte frost" "garnett" "antique gold" "chocolate" "burnt sienna" "rustic clay" Creative Inspirations
- dies: Cheery Lynn Designs + Magnolia
- embellishments: Le Scrap Des Lutins + Magnolia + golden branch Prima

That's all for me, hope you will like it, and don't forget to take part on our weekly challenge every sunday and get the chance to win some jars from that terrific paint! Love from France, Kianel.

Monday, August 1, 2011

Creating Shadows and Highlights


Hi, Beth Norman here with a tutorial for you. Today I will show you how to create shadow and highlights on your cards. I used Prismacolor pencil crayons and oderless mineral spirits, but if you don't have these mediums, regular pencil crayons will work.

* * *


Begin by envisioning where the sun sits. If it helps, draw a circle on your paper.


Start to color, paying attention to the sun's reflection.


Lightly color all areas of your image. Remember, where the sun would touch, leave it white.


Deepen areas that have shadows. Remember, creases fall into shadow areas too.


To carry it a step further, pull out your color wheel and select a color that is lighter than your main areas. This will give you highlights. My color wheel is from The Color Wheel Company.


Continue adding more shadows and highlights until you are happy.

Finish by painting CI paints onto colored image. Here I used Fuchsia and Plum. Two yummy colors.


I hope you learned something today. Happy painting.