Inspirations

Inspirations
The color you see is the color you get!

Monday, April 22, 2013

Canvas + CI Paints = Timeless

As you all know, I love creating with canvas... I could work with nothing but various size canvases and be completely happy. Yesterday, I pulled out some printed canvas that I had purchased at Michaels a while back and a 6x6 canvas along with my Creative Inspirations Paints and got to work. 

I used a mixture of Beige, Carmel and Antique Copper paints on the canvas page with the clock print. I used a fabric medium with the paints so that they would blend into the canvas rather than only sit on top of it. This was the first time I tried this with the CI Paints. It worked rather well. I sealed it all with a matte medium and Mod Podge. 


I had some foil tape left over from a previous project that was embossed with clocks... this I adhered with modeling paste to the front, and another to one side of the canvas. Tissue paper, joint tape and more modeling paste was added to the other sides of the canvas for texture. For the first time, I did not add any stamping to a canvas. I may go back and change this, but for now I like how it looks. More Antique Copper was added to the sides and front embossed clock. After it dried, I went over the raised portions of the front and sides of the canvas with some Antique Gold using my finger. When you look at the canvas from any side it has that fantastic shimmer that we all love so much with the paints. 


In the close ups above, you can see the texture that the embossed foil tape, modeling paste, tissue paper and joint tape created. I find it fun to finish the sides of my canvas as though they are the center of the piece themselves. I like it when you can look at a project from any side and see lots of detail. Something to think about the next time you create a canvas piece. :) 

And as always, the colors I used in my piece... 


Wishing you a wonderful day full of creativity and messy hands!! 


Sunday, April 21, 2013

Inspired by: Anything goes


Thanks to all those who joined in our "Spring Colors" challenge, 
we enjoyed all your wonderful creations!
 Check the post below to see the
  Random.org Top 3!
 ---------------------------------------------

This week's challenge is:
Inspired By: Anything Goes
Here's some inspiration:

I know you are all excited about this challenge and we get a lot of entries. I created this flower from a 
spellbinders die cut


I used the Creative Inspirations shimmering paints to match the colors in the background of the
 patterned paper


The colors I used that matched beautifully are gold, amethyst  and canary. The very center is a jeweled inspiration. I tend to like these a lot if you have noticed


Inside my lamp is a battery operated tea light that you can get almost anywhere for a couple of dollars


Thanks for stop for more information on my project please visit my blog at 
http://dianamlarson.blogspot.com

I hope you have enjoyed my project and will play along with this week's challenge!!
Remember you do not need to use CI Paints on your projects but if you have them we would LOVE to see how you used them!!
As always thanks for stopping by and
have a great week!
DIANA L.

---------------------------------------
General Challenge Rules

Each week you will be given a challenge to find inspiration in/from what ever the challenge theme is... you can be as literal or abstract in your inspiration as you want....Just make sure you can tie it back to the theme! Challenge closes at 6:00pm Eastern on Saturday.
You will always be able to jump back to the current challenge by clicking the "Current Challenge" link in our sidebar. The rules can always be found by clicking the tab "Challenge Rules" at the top of the page.
You do not need to use the Creative Inspirations Paints in your project, however, if you do, tell us which colors you used, and your name will go in the drawing twice! Each month, one person will win 5 jars of paint in the colors of their choice. The winner will be randomly drawn from all the people who have played that month, so make sure to join in on our challenges each week!
---------------------------------------------

Random.org Top 3 Inspired by: spring colors


Thanks to those who joined us last week for our
 Inspired By: Spring Colors challenge! 
Here are the Random.org Top 3:
#111 Julie O


 #29 Tracy M


 #79 Debora


  Beautiful work ladies!
You each will receive an extra entry in our April drawing for some CI Paints of your own!
You can grab this badge for your blog:

Saturday, April 20, 2013

A Marbled Card using CI Paints

Hello again friends! Emily here with another card to share with you that I made using some Creative Inspirations Paints. For today's card I used a marbling technique that our tutorial queen, Kassi shared with us. I am in LOVE with this technique! 

Here is the original video:


Here is the final card... 


For my card and the marbling, I used Autumn Wheat and Carmel CI Paints with some Vintage Photo Distress Stain. You can also use the Vintage Photo Distress Ink if you don't have the stains. Kassi uses Distress Ink in her tutorial video. I love the final result you get with this technique! It looks so good! 

Here are some close ups of the card...


I embossed the sentiment with Deliquesce Metallic Copper embossing powder. It really went well together with the other paints used in the card. I added some Beige and Antique Copper paints to some Prima flowers for added color. 

Below are the CI Paints and products used.... 


I hope you've enjoyed my projects the past two days! I will see you on Monday with another project!! 


Friday, April 19, 2013

Card using Gelli Plate and CI Paints

Hi and Happy Friday everyone! It's Emily here, and today I have a colorful card I made using some wonderful Creative Inspirations Paints and embossing powders along with my Gelli Plate. 

I was curious if the CI Paints would work differently on the Gelli Plate than typical acrylics, but guess what? They don't! They work just as well as basic acrylic paints! And with the CI Paints you get the added shimmer bonus! 

Here is how my card turned out... 


The sentiment was stenciled on with modeling paste and then I sealed it with Deliquesce Clear embossing powder. Deliquesce Fine Black embossing powder was used around the letters to make them pop. The whole card has this shimmer... in person it is awesome!  

You can see some of the shimmer below....
This was definitely one of my favorite cards to make. I used Fuchsia and Denium CI Paints for the dots and chevron patterns. The yellow is a heavy body acrylic. I was originally afraid I would get a greenish color with the Denium over the yellow acrylic, but it didn't happen. That is one of the great things about the Creative Inspirations Paint. Since they are transparent, they will still retain their color when painted over another lighter color of paper or acrylic. And you can see the Denium dots through the Fuchsia in their original color as well. It's best to make sure that each layer is dry before adding another with the CI Paints in this kind of process. This is what I found was best. :) 

Colors used in "High Five!" Card:


Thanks for joining me today! I will see you tomorrow with another card I made using a technique shared on an older tutorial post..... it's definitely a post you can't miss! 


Thursday, April 18, 2013

Thursdays Technique!

Happy Thursday everyone one more day and its TGIF!! Woo hoo so excited.  Today I am sharing something different from the norm.  This is something that has become popular amongst some crafters its altering wood - yeah sounds boring for sure.  When I first heard it I was like ok wood, not!  Well I love doing it now especially since I love altering things and how cheap is a piece of wood right. 

 The chipboard pieces are from Gina's Designs and this is a piece I requested which is so nice.  She can make almost anything ladies and gents...
 Now the embellies on it are resin pieces I made from earrings and the key is a charm I only had one left so I molded another one and then painted them with CI Paints.  Added some Graphic 45 papers and a butterfly and I was sold on altering wood.

Everyone give it a try and let me see what you can come up with?  Simply Monica


These were my colors of choice and yummy together I must say!

Wednesday, April 17, 2013

Altered Bird Cage!

 
Greetings CIP Fans!
Spring is here in the US and I wanted to share some more amazing & gorgeous  CIP Spring colors with you today! 
For the vine leaves I used the color Sage and for the leaves by the flowers
 I used Emerald CIP color!
The flowers I used the gorgeous Lavender color and for the center of the flowers I used the gorgeous Plum color!
I love all the colors and the shimmer on this project!
If you love the Purple tones Creative Inspirations has a few more colors
 in the Purple tones to choose from!
To add some more color to the bird I added Mocha Latte to the
 wings and tail.
 
                           A close up of all the amazing shimmer!


The amazing colors!


Don't forget we have a color combo challenge on CIP facebook!
We also have the Spring Colors challenge here on the blog!
Each challenge you join in your name will be added to the drawing to wins some amazing CI paints!
Thank you for visiting the CIP blog today!
Have a wonderful day!
Michelle

Tuesday, April 16, 2013

Sweeet Birthday Flourishes

Hello everyone and Happy Tuesday to all!
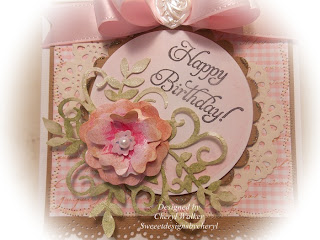
 I created my card for Creative Inspiration Paints, using the Beautiful Paints, and a little glitter!


I cant wait for all the flowers to BLOOM! I love flowers, and I love Summer!!!! On this CottageCutz Flourish Layered Flower
I used the beautiful CIP's
Fuchsia
Tickled Pink
Tutu Pink
Those were used on the flower layers
For the Greenery
Evergreen
Green Olive

On the scalloped circle I used CIP's Deliquesce Gold Crystal


I started with the darkest pink, and worked my way out. Then I used some distressed inks on the edges of the flower layers.

For the greenery I used the lightest green, then painted over some with the darker green, then dabbed some off. I absolutely Love the look you get with these beautiful shimmery paints!!!  Hope you can see by clicking on my photo's to enlarge them!!

I used some leftover Pink Gingham print Dp and then layered it with CottageCutz Scalloped Doily. I did add sewing,Really Reasonable Ribbon, Pearl, and a button to complete my card.


Thank you for looking and have a lovely day!!
hugs to all

Monday, April 15, 2013

Fun Layout

Hello Everyone!!

It's Kendra from Luv 2 Scrap N' Make Cards, wanting to share a fun layout I recently created for my son's album.

The chipboard arrow on the top of the page was covered with Denium Creative Inspirations Paint.  
After it dried I used a dot stamp and some Versamark ink to add the dots and embossed with Deliquesce Fine White Embossing Powder.

I just love how it turned out and kind of helps the eye lead you to my son in the picture!!

The heart was also a chipboard piece I covered with polka dot paper.  I used a pencil to dip the eraser end in Fairy Dust Creative Inspirations Paint and then dabbed it on the polka dots on the to give them shimmer as well as a little texture.
Lastly I used a glue pen to trace the "Love" sentiment and add Resplendence Angel Dust Glitter!


I just love my shimmery paints and other CI Products!!


Have a wonderful day!

Kendra

Sunday, April 14, 2013

Inspired By: Spring Colors....... Week 2


I hope you are all having a great Sunday


This is week  2 of our
Inspired By: Spring Colors
challenge

Click here to see the original post and to link up


I hope you are still  inspired


I will be back next week to pick the top three

Have a wonderful and blessed week,
Diana  (aka- DIANA L. or DL.ART)


Saturday, April 13, 2013

faux canvas...

Hello my wonderful friends!

As an artist, one of the most intimidating feelings can be staring at a blank canvas. (yes, even those of us who have been at it for a while can feel this way...)

  Maybe it is the fear that we won't be able translate what we see in our mind to what others see on the canvas... Maybe it is the decisiveness of the first brushstroke eludes us... Maybe we are just afraid we will make a mistake. 

I know the feeling. I stand there staring at that stark white and it seems to swallow me whole. I have found it really helps me when I truly let myself embrace the belief that art is not about right and wrong... it isn't about making mistakes, but rather about feeling, expressing, and "dancing like no one is watching".  At least that is what works for me. Everyone must find their own way in art. 

However, finding your own way can get kind of expensive... have you taken a look at the price of canvases lately?  Yeah... that could be part of the reason the blank canvas is so intimidating. They are far to pricy to waste!  

So... how about a little faux canvas for playing with?

Gauze is much better priced in my opinion!
This works with many surfaces, however, the thicker, the better. I have used heavy cardstock, but it did curl quite a bit with all the moisture.  Chipboard and wood won't curl, but it is up to you.


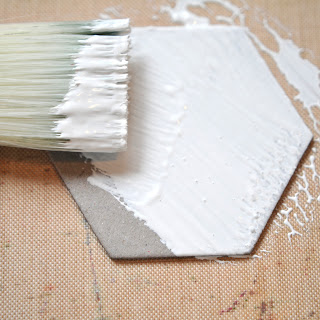
Step 1: Coat your piece with Gesso. 

Step 2: While the Gesso is still wet, press the gauze into it, pulling the gauze tight. We are using the Gesso not only as a base coat, but also as our adhesive.

Step 3: Brush on a layer of Gesso over top of the gauze.  I like to follow the lines of the gauze both up/down and across.

Allow it to dry.

Step 4(a): Use a pair of scissors to trim along the edges of your piece

OR

Step 4(b): Trim around your piece leaving enough to wrap around and tape on the back.  This gives the wrapped canvas look that you get when you buy a stretched canvas... however, it is rather hard to do if you have anything other than straight lines. 

Your choice.

From here, it is up to you what you do with your faux canvas...


of course, I'm going to paint mine with Creative Inspirations paints...  LOL!

Step 1: Stamp an image using permanent waterproof ink like Archival ink. (this takes a little practice... remember it is a textured surface, so you need to apply a little more pressure than usual!)

Step 2: Paint in your image using your preferred method... I used All Purpose inks because when set with heat, they won't bleed with the next step.

I wanted to "antique" my canvas, so I made a glaze using clear Gesso, a tiny bit of Antique Linen Distress reinker, and Creative Inspirations Autumn Wheat for a hint of shimmer (love this!!!)

Step 3: Brush on antiquing glaze

A little ink around the edges, and I have a finished antique faux canvas with a hint of shimmer. LOVE!


No, it isn't the same as working on a real canvas, but it still is a fun surface to work on! And who says art has to be on a "real" canvas anyway? Not me!

Enjoy!