Inspirations

Inspirations
The color you see is the color you get!

Saturday, May 14, 2011

frosted glass...

Hey everyone! I'm glad to see you all survived Friday the 13th, and are back here for more inspiration!

While sifting through my box of "ideas in progress", I came across a technique that I had played with a while ago, and had stuck in my box and forgotten about... I thought I would pull it out today and share it with you.

What you need:
Mulberry Paper
Clear Embossing Ink
Clear Embossing Powder
Stamp
Creative Inspirations Paint
Anti-Static Duster
Damp Cloth
Clean Water (optional)

 Step 1: Prepare your mulberry paper by rubbing it with and anti-static duster... These are known by several names (Embossing Buddy being one) and are basically a fine powder that you spread on a surface before heat embossing to ensure the powder doesn't cling where you don't want it to due to moisture or static. Very handy. =)

 Step 2: Ink up your stamp with your clear embossing ink.

 Step 3: Stamp your image onto your mulberry paper.

 Step 4: Cover with Clear embossing powder.  Due to the "hairy" texture of the paper, you may find that you have small fibers sticking up that are covered with powder.. You can remove these with tweezers if you want, but I haven't notice much difference once heated. 

Step 5: Melt the embossing powder as you would normally do.

 *Optional*  if you want a softer edge, dip a paint brush in clean water and drag it across the edge. You can then gently tear the paper.  This will leave a soft "fuzzy" edge.  It works best if you work in small areas at a time so your paper doesn't dry before you tear it.

 *random side note: remember those cute "tear bears" that were so popular?  This is one of the ways that people got that fuzzy look on them. =)

ok.. back to business....
 Step 6: Paint your embossed mulberry paper with your choice of Creative Inspirations Paint... I'm using Denium.

Step 7: Allow to dry.

 Step 8: Using a damp cloth or paper towel, wipe the CI paint off of the embossed areas.  The moisture on the cloth will be enough to wipe the dried paint off the embossing.

 And here is your final piece... all sparkly and pretty!

And the cool thing...
 Where you have embossed, it is semi-translucent.. meaning you can see through it (not perfectly clear, more like looking through frosted glass.) In this picture, I am holding it up in front of a window.. it almost glows!  So pretty!

 For this card, I decided to add a little bit of color to the back of the embossed part with markers. It added such a nice soft color!


Have a fabulous weekend everyone!
~Kassi

Friday, May 13, 2011

look at them jars...

Sorry we are late on our post today. Anyone who tried to post yesterday using Blogger will understand that they had major problems!  And then I wake up this morning to my internet not working.. I tell ya, I never really believed in the whole "Friday the 13th" but the way today has been going... =P

Anyway, today I have a quick tip for you...

Have you ever noticed just how darn cute the Creative Inspirations paint jars are?  Well, why not recycle them?  Once you have used up all the paint in the jar, don't throw them away!  Instead, soak the jars and lids in warm soapy water for a while. The paint will soften and come right off with just a little scrubbing around the threads of the jar.  Once they are clean, let them dry. They are then ready to be used as mixing jars for custom mixed CI paint colors, or as containers for your small embellishments like brads, rhinestones, and sequins!  

How do you reuse your empty jars?

Thursday, May 12, 2011


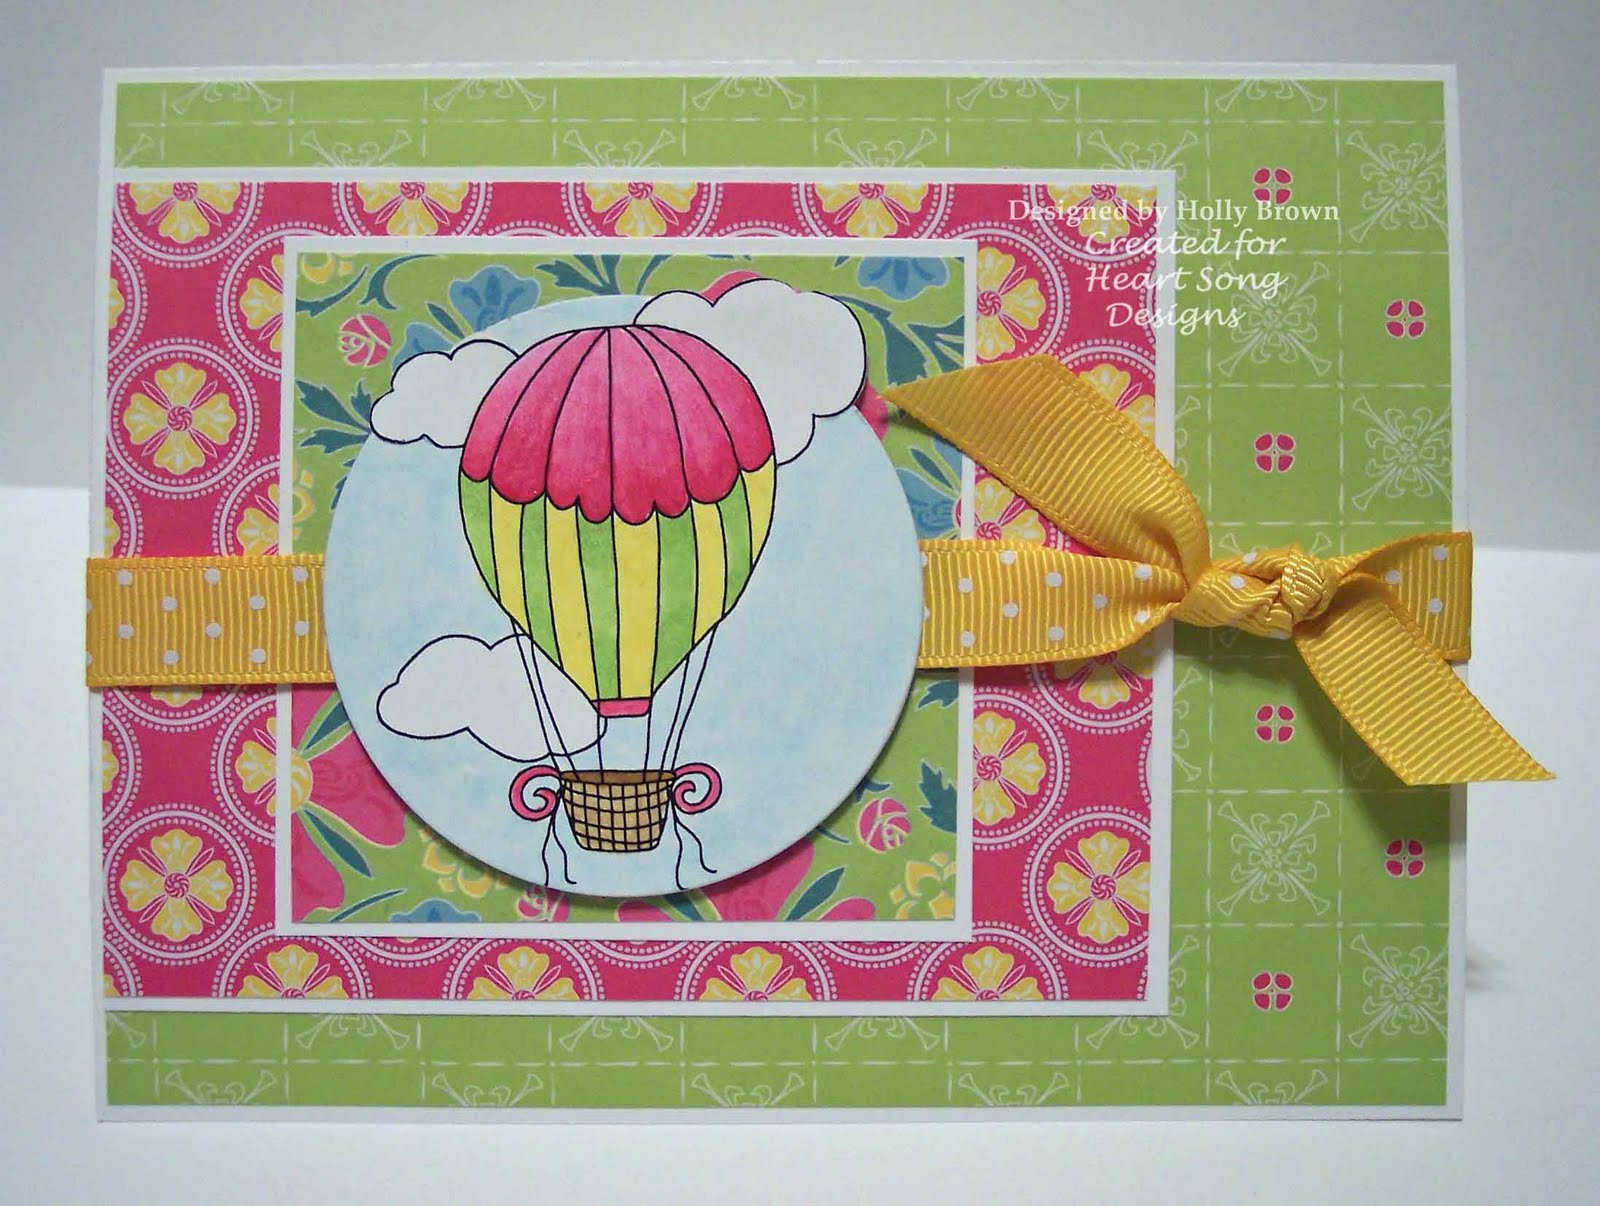
Good morning! It's Holly posting and today I'm sharing this bright and fun card with y'all. I colored this hot air balloon image from Heart Song Designs with Copic markers, and then I went over them with some shimmery Creative Inspirations Paint. Then I used the Out of the Box Nesties technique from Technique Junkies to cut this out and attached it to this card.

I used some Mellow Yellow paint on the green and yellow stripes of the balloon and some Fuchsia paint on the pink part of the balloon. Here is a close-up so you can see the fabulous shimmer:


Creative Inspirations Paint: Mellow Yellow, Fuchsia
Stamps: Hot Air Balloon from Heart Song Designs
CS: White, DeLovely dp (Cosmo Cricket)
Other: Copic markers, circle die, yellow ribbon
TJ Technique: Out of the Box Nesties

Wednesday, May 11, 2011

Gift box - Kianel

Hello,
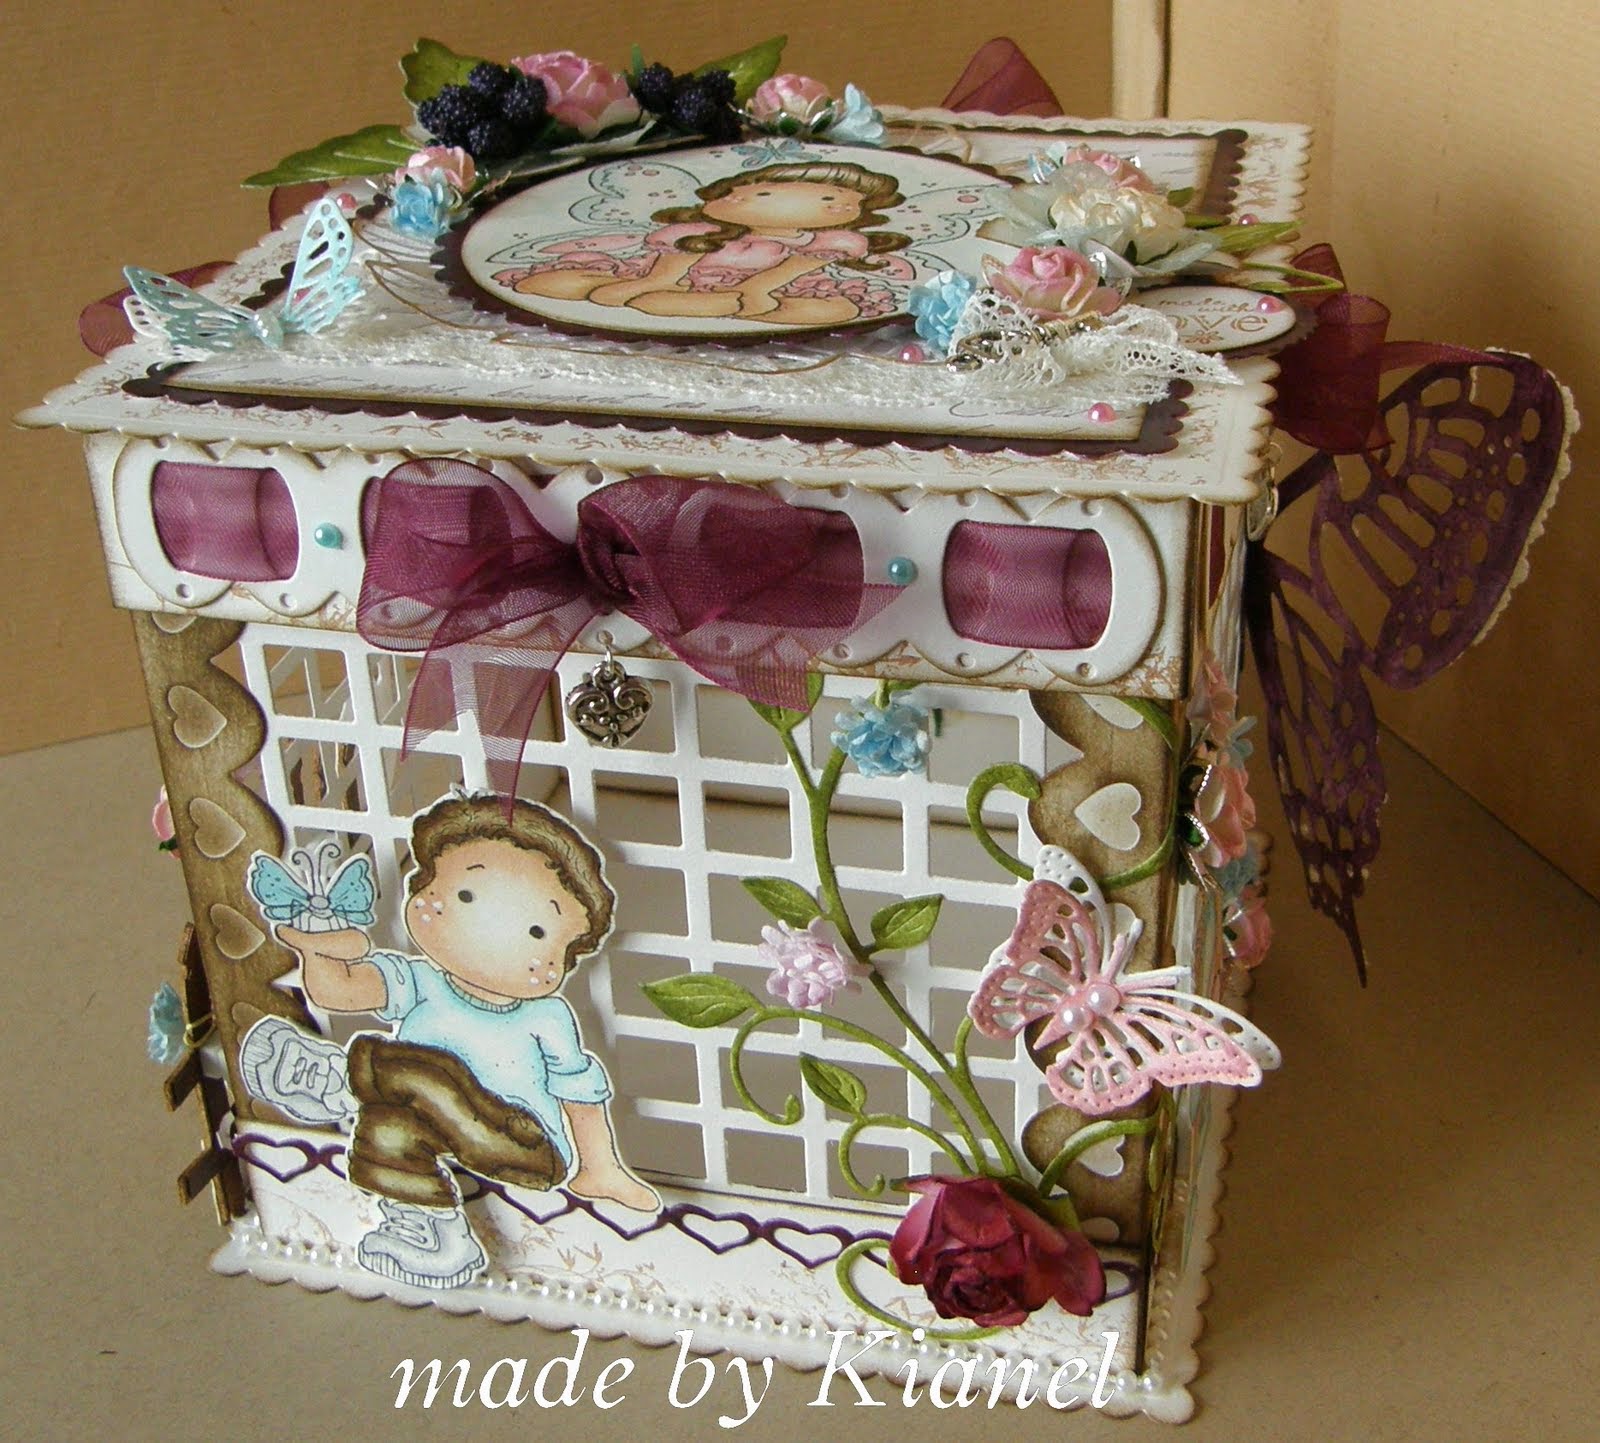
Kianel here with you to share a gift box i made out of CLD dies only with Magnolia stamps and many Creative Inspirations paints. You can see all detail pictures on my blog here. For this box, i used the following CI paints: "fairy dust" "sky blue" "sage" "burgundy" "tutu pink". I also wanted to tell you that Ci paints works perfectly on papers but i also tried it on lace paper and that is a stunning effect! Wow! And look at that beautiful deep burgundy color!!!


List of material:
- papers : Canson 300gr & 240gr + lace paper
- stamps : Magnolia + Stampabilities + Just rite
- paints : CI
- inks : distress + versafine + colorbox
- dies : CLD
Hope you'll like it and don't forget to join our weekly challenge on sundays!
Love from France, Kianel.

Monday, May 9, 2011

Painting on your Scrapbook Layout


Hi, Beth Norman, here. Did you know you can paint on your scrapbook layout? They add so much sparkle and shine.


Flowers are painted. Don't they sparkle?


In my dreams, I picture faires all glittery, and Creative Inspirations Paints does that.

Sunday, May 8, 2011

CI Paints Inspired By: Your Fav. Color


Thanks to all those who joined in last week and shared their "Inspired By: Mom or Special Lady" creations!

Also Happy Mother's Day to all the mom's! Hope you have a wonderful day!

Make sure to check the post below to see our random.org Top 3!
---------------------------------------------

Each week you will be given a challenge to find inspiration in/from what ever the challenge theme is... you can be as literal or abstract in your inspiration as you want....Just make sure you can tie it back to the theme! Challenge closes at 4:00pm Eastern on Saturday.

You will always be able to jump back to the current challenge by clicking the "Current Challenge" link in our sidebar. The rules can always be found by clicking the tab "Challenge Rules" at the top of the page.

You do not need to use the Creative Inspirations Paints in your project, however, if you do, tell us which colors you used, and your name will go in the drawing twice! Each month, one person will win 5 jars of paint in the colors of their choice. The winner will be randomly drawn from all the people who have played that month, so make sure to join in on our challenges each week!

---------------------------------------------

This week's challenge is:

Inspired By: Your Favorite Color

My favorite color happens to be yellow, although pink comes in very close.  Here is my creation, as yellow always reminds me of my racecar:


I used "Mellow Yellow" to add shimmer to the car!

We hope you'll share your favorite colors with us!

Have a great week!

Kendra

----------------------------------


Mom or Special Lady Random.org Top 3

Again to all of those who joined in our Inspired By: Mom or Special Lady challenge, what some beautiful projects!

Here are the Random.org Top 3 Picks:

#27 Karin


#15 Chris


#28 Bethie

Beautiful work ladies!
You each recieve an extra entry in our May drawing.

You can grab this badge for your blog:
 

Saturday, May 7, 2011

dipped roses...

Hey everyone!
As tomorrow is Mother's Day (at least here in the States), I thought I would share a quick project that will make a long lasting bouquet of roses.

What you need:
White or Cream Wooden Rose Buds
 (I've seen them in random shops for about 25 cents, or you can find them online)
Creative Inspirations Paint
Water
Scented Wax (optional)

Let me start by saying, you can simply paint the whole flower if you want total coverage... I like the soft dainty look of only the edges having color and shimmer, so that's what I'm showing today.

 This is what the wooden rose bud looks like. It is made from very thin pieces of wood.

Step 1: put a small glob of Creative Inspirations Paint on a non-porous surface. Here I am using Rustic Red on an acrylic block.

 Step 2: add water. For this to work, you need to have your paint fairly thin.

 Step 3: dip the top of your rose into your puddle of paint... Just hold it there and let the paint naturally wick up the wood. This give a very nice soft natural  look.

Step 4: you may need to use a paint brush to add color to some of the inside petals that are too short to reach the puddle of paint. Again, just hold the paint brush to the edges and let the wood naturally soak it in.

If you want the soften the color slightly and help it wick farther up the flower, rest the top of your rose in plain water.

Allow to dry, and you are done.  Beautiful color and shimmer just on the tips of the roses!

Optional for adding scent:

Step 5: melt some scented wax. I'm using Soy Beans by Bean Pod Candles which are just tiny drops of scented wax used for making your own custom scented candles, but you could also use the wax from a regular scented candle. An easy way to melt the wax is to put it in a heat safe container and set it on a candle warmer (after all, the purpose of a candle warmer is to melt wax without a flame)

Step 6: quickly dip the tips of your flower in the melted wax.

Because you only need to use a thin layer of wax this should not hide the color of the paint, or the shimmer, it will simply make it smell good... After all, part of the beauty of roses is they smell fabulous!

Do a single long stemmed rose, or do a dozen... they are quick and easy, and look beautiful! 

Happy Mother's Day, and have a wonderful weekend!

Friday, May 6, 2011

happy mothers day!

On behalf of Creative Inspirations Paint and our design team, I would like to wish all of you a wonderful and happy Mother's Day weekend! 

Thursday, May 5, 2011

For You, Mommy

This week at Creative Inspirations Paint we are being inspired by the special ladies in our lives, whether that by our mother or somone else who has an extra special spot in our hearts. 

I had the privelege of making a card for a yound lady to give to her mother. We wanted lots of flowers and this cute stamp had flowers.


  I decided to try some faux flower soft by rubbing two pieces of styrofoam together until I had lots of shavings.  I colored it with my Creative Inspirations Paints using Sunshine, Amethyst, Blush and Green Olive. I only used a drop of paint and it colored a lot of "Flower Soft".  I also used those colors for the butterflies. I first colored the image with Prismacolor Pencils and then adhered the faux flower soft.


Thank you so much for visiting CI Paints and taking the time to enter our challenges.  Don't forget to check out the wonderful tutorials and discover all the different ways you can add some shimmer to your creations with Creative Inspirations Paint.

Wednesday, May 4, 2011

Beautiful You


This week's Creative Inspirations Paints Challenge is all about MOM or a Special Lady in your life:) So, I thought it would be nice to make a Mother's Day card using one of my Mom's favorite colors and incorporating one of her favorite things...flowers. She is an avid gardener and loves all things bright and cheerful. The floral background was created by sponging Rose Quartz CI paint over a Dreamweaver stencil, then cut out using a Nesties Curved Rectangles die. The large blossom was made using the scraps from the background and another Nesties die...Dahlia. I love how the CI paint adds such a soft shimmer:) It isn't overpowering; and it adds that perfect touch of elegance. I just love that! If you look closely, you will see that the bow also has a hint of shimmer. Yup...you guessed it...it started out a simple, white ribbon...but got the star treatment by simply adding a beautiful frosting of Rose Quartz CI paint:) I hope you found a bit of creative inspiration today. Thank you for dropping by and sharing a portion of your day with us here at CI Paints!!!! I hope your day is filled with happiness and overflowing with blessings!!!

HUGS!!!
Carolyn

Tuesday, May 3, 2011

Always in Our Hearts

This week's challenge is Mother or Special Lady. Many of our Moms are no longer with us; however, they will always be remembered in our hearts. I thought that this watering can of flowers was a pretty tribute to Moms everywhere. All coloring was done with my CI paints -- spring green and sunshine yellow for the flowers, and antique silver for the watering can. I used the level up technique from Technique Junkies for the flowers. In this technique I stamped the flowers several times. I cut out segments of the flowers and adhered them on top of the image to give depth. The height of the layering is subtle, but it gives dimension to the flowers. The background of the circle was sponged with aqua. I used the sun eyelets in each of the holes around the circle.
Happy Mother's Day to everyone.
Barbara Washington--Designer

Monday, May 2, 2011

Creating Your Own Papers

Who always needs all those designer papers, especially when you have Creative Inspiration Paints?  Yes, I love paper like many people, but it is fun to create your own!

For this card I created all my own papers:

first stamped two swirls on the card stock and then used a cotton ball to sponge some different shades of brown Creative Inspiration Paints onto the cardstock.
I used "Tan", "Raw Sienna" and "Autumn Wheat". As you can see in the above picture I first dab the cotton ball on my scrap piece of paper before onto my good cardstock as I want to dab some of the paint off first so I don't get one huge glob of it in one spot.
I just love how it turned out:

Here's another close-up after the card was put all together:

The green embossed paper:
I used "Sage" and "Green Olive" for this piece.


Have a great week!

Kendra

Sunday, May 1, 2011

CI Paints Inspired By: Mom


Thanks to all those who joined in last week and shared their "Inspired by: The Rainbow" creations!  Love all the bright fun colors!!

Check below to see our April Winner!!  and our Random.org Top 3!

---------------------------------------------

Each week you will be given a challenge to find inspiration in/from what ever the challenge theme is... you can be as literal or abstract in your inspiration as you want....Just make sure you can tie it back to the theme! Challenge closes at 4:00pm Eastern on Saturday.

You will always be able to jump back to the current challenge by clicking the "Current Challenge" link in our sidebar. The rules can always be found by clicking the tab "Challenge Rules" at the top of the page.

You do not need to use the Creative Inspirations Paints in your project, however, if you do, tell us which colors you used, and your name will go in the drawing twice! Each month, one person will win 5 jars of paint in the colors of their choice. The winner will be randomly drawn from all the people who have played that month, so make sure to join in on our challenges each week!

---------------------------------------------

This week's challenge is:

Inspired By: Mom or a Special Lady

Here's a card for some inspiration:


Close-up of a few of the tulips:

I used the paints to watercolor this image.

We can't wait to see what you create!

Have a great week!

Kendra

-----------------------------------


April Winner and "Rainbow" Top 3

Thanks again for all those that joined in our "Rainbow" challenge last week and to everyone who joined our challenges in April!  Can you believe it is May already!  Which means we have a winner to announce!!

CI Paints April Winner is..........

CONGRATS!!
If you can just send us an email with your mailing address, and the 5 colors you would like, we'll get your prize out to you: ci.shimmer.paint at gmail dot com

Your welcome to grab this badge for your blog:

------------------------------------------------------------------------

What some great "Rainbow" inspired cards!  Loved all the rainbow colors!!

Here are the Random.org Top 3 Picks:


Beautiful work ladies!
You each recieve an extra entry in our April drawing.

You can grab this badge for your blog:
CONGRATS everyone!