Inspirations

Inspirations
The color you see is the color you get!

Sunday, June 16, 2013

Random top 3 Inspired by: Fathers Day


Thanks to those who joined us last week for our
 Inspired By: Father's day challenge! 
Here are the Random.org Top 3:

#19 Becky G.


 #56 Sunshine honey bee


 # 45 Leann


  Beautiful work ladies!
You each will receive an extra entry in our July drawing for some CI Paints of your own!
You can grab this badge for your blog:

Thursday, June 13, 2013

Mini Album Dangle Charm

Hi CIP followers!  I have the dangle charm I've made to go with the mini album I shared in last week's blog hop (CIP and GJS).  I've used the new Resinesence (CIP UV Resin) in the bottle cap, and dyed some seam binding in the Sky Blue shimmer paint to tie with some brown ribbon at the top.  I adhered the picture, added the resin, and then punched holes in the bottle cap.  *Note - Punching the holes after letting the resin set in the sun made it crack from the pressure.  While I actually redid it (punching the holes first) I decided that I really loved the cracks in the original and decided to use that bottle cap.  In the close-up you can see the dangle charm attached to the mini album.  Each of the CIP items can be found in the Creative Inspirations Paint store.  
Here is a closer look at the CIP products that I've used:
Don't forget to check out the current CIP challenge that Diana posts twice a month (with a mid-challenge reminder)!  Our current challenge is: Father's Day

Thanks so much for stopping by!

hugs
Kimberly

Wednesday, June 12, 2013

Dad Card with Dana


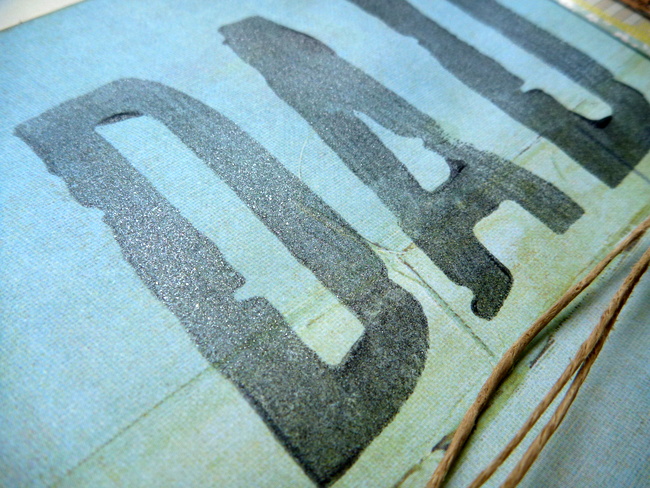
Hi CIP fans! Dana here today sharing a clean and simple card for the Father's Day theme this week. I have a Making Memories Jersey Foam Stamp Set that I love using with my Creative Inspirations paint. The font is perfect for all my masculine projects and the CI paints work wonderfully with the foam.


Check out the fantastic sparkle! It's subtle enough to still be manly!


Thanks for stopping by today!

Tuesday, June 11, 2013

Keychains? Or Bookmarks?

Hello!

Shea here today with something I was playing around with the other day and wanted to share.  And you may decide for yourself what they really are.  (They're not keychains.)  :-)
 

I know, I know, they LOOK like keychains, and I suppose you could use them for that if you wanted, but I think they'd be really cute bookmarks as well.  At least that's what I'm telling my husband when he opens his Father's Day card and one of these falls out.  Shhh...

They are made with clear shrink plastic, CI Paints, CI Resinesense, and rhinestones (one of which is a CI Jeweled Inspiration).

I cut the shapes with regular dies (the largest of each shape), punched a 1/2" hole in one end, sanded one side with fine grit sandpaper, and painted the sanded side with CI Paints, in this case Gold and Garnet.  Now before I go any further, let me say that some of the pictures don't match the finished products because I wasn't really planning on doing a tutorial per se and just snapped a few pics here and there as I was experimenting.  The pic below on the left was not a keeper.  I tried to use more than one color and it didn't work out.  The one on the right worked fine.

Two colors turned very muddy when shrunk.
A single color worked much better.
After painting the shapes, I stamped images with Staz-On.  Then I put the heat gun on them until they were shrunk.


Here's a confession: I was actually trying to use the shiny (non-sanded) sides of the shapes, but after several failed attempts, it turned out that the painted side looked better - shimmery and glittery!

Tip:  For larger shapes, dust with Embossing Buddy first so the shape doesn't stick to itself when shrinking, like this one did.  It was a challenge to flatten it out.  (Some colorful language may have ensued.)

At this point I  painted the backs of the shapes with the same color paint, four coats.  Then I signed them and topped things off with a coat of clear glaze. 

Now it was time to finish the fronts.  I used CI Paint's newest product, the wonderful one-step resin, Resinesense.  I applied several thin coats to allow the resin to build up into an attractive, full shape.  Of COURSE I goofed and caused one of the shapes to leak resin into the punched hole, but a small drill bit took care of that after it dried (because that was when I discovered it).  The good news is the shimmer from the paints isn't dimmed at all by the resin. 

I applied a rhinestone to one and a Jeweled Inspiration to the red shape.  It just took a tiny bit of glue to hold them until the resin could anchor them in place.  Those babies aren't going anywhere.

And here are the finished products.  There is a lot of room for creativity here.

Needs more stamping.
A little too much stamping.

This one's juuuust right.

Thank you for joining me and I hope you give these keychains er... bookmarks a try.  We'd love to see them!  And don't forget to join our current challenge, the theme of which is Inspired By: Father's Day!

Happy crafting!


CI Paints Supplies:

Paints: - Gold, Garnet
Jeweled Inspirations
Resinesense


Monday, June 10, 2013

I Love You to the Stars and Back

Hello everyone! Hopefully you were able to check out all of the wonderful projects in the recent blog hop between Creative Inspirations Paint and Genuinely Jane Studios! If you didn't you can go back here and see all of the links to the projects on the hop. 

For my project today, I used a page from a GJS Bracket Album to make this star covered hanging using some CI Paints and Deliquesce embossing powders. 

Black gesso was used to cover the front and back of the wood bracket before adding modeling paste using a CW star stencil. After the modeling paste dried, I painted the stars with Antique Silver CI Paint and embossed around the edges of them with Deliquesce Platinum embossing powder. 

The sentiment was made by painting cardstock with more black gesso and using a stencil and some yellow paint for the sentiment. After it dried, I embossed around each letter using Fine Black Deliquesce embossing powder and then used some Buttercup CI Paint over them for some shimmer. I wanted hearts on this since it was a love theme, so I painted some Studio Calico wooden hearts with Tickled Pink paint and added them in various placed. The sign was tied off with black ric-rac ribbon. 


As you can see there is a lot of shimmer to this project! My daughter fell in love with it when she saw it, so I have it hanging in her room. 

Below are the CI products used on my project. 


Thanks so much for stopping by! Be sure to check out the Inspired By: Father's Day Challenge going on and have a wonderful day!!! 


Sunday, June 9, 2013

Blog Hop Winner

We have a winner from our GJS an CI Blog Hop!

Thanks to everyone that joined and left sweet comments here and for all the designers!!

Random.org picked #8, which was....


Please e-mail us at: ci.shimmer.paint(at)gmail.com

With your choice of 5 paint colors, 5 glitters or embossing powder colors!  You will also receive a bottle of our new resin!!

CONGRATS!!

Inspired by: Father's Day week 2


Hi Everyone,
this is DIANA L. from DL.ART, 

This is week Two of  the challenge:
Inspired By: Fathers Day
Here's some inspiration:


I used the antique gold creative Inspiration paints on the cards and on the vertical and horizontal lines on the top.  I used quite a few jeweled inspirations on the bottom.


I used Graphics 45/ Echo park paper


I hope you have enjoyed my project and will play along with this week's challenge!!
Remember you do not need to use CI Paints on your projects but if you have them we would LOVE to see how you used them!!
As always thanks for stopping by and
have a great week!

For more info on my project hop over to my blog at
http://dianamlarson.blogspot.com
Have a blessed day, DIANA L.
---------------------------------------
General Challenge Rules

Each week you will be given a challenge to find inspiration in/from what ever the challenge theme is... you can be as literal or abstract in your inspiration as you want....Just make sure you can tie it back to the theme! Challenge closes at 6:00pm Eastern on Saturday.
You will always be able to jump back to the current challenge by clicking the "Current Challenge" link in our sidebar. The rules can always be found by clicking the tab "Challenge Rules" at the top of the page.
You do not need to use the Creative Inspirations Paints in your project, however, if you do, tell us which colors you used, and your name will go in the drawing twice! Each month, one person will win 5 jars of paint in the colors of their choice. The winner will be randomly drawn from all the people who have played that month, so make sure to join in on our challenges each week!
---------------------------------------------

Saturday, June 8, 2013

color me resin...

Hello my wonderful friends!

I hope you have enjoyed the Genuinely Jane Studios and Creative Inspirations blog hop! So much creative talent involved!  So, now how about a little tutorial to get you even more inspired (hopefully) to take some time to create some art!

A couple of weeks ago, when I posted my last tutorial for Creative Inspirations Paint, it was introducing the new Resinesense, and just one of the MANY ways to use it.... with a mold.  (You can check out that tutorial HERE.) 

Well, today I want to continue our exploration of that technique a little farther because someone sent me a question about it. (See, send me a question, and I listen! You might even get a whole tutorial on it!)

I mentioned in my last tutorial, that you can use the Resinesense in a mold, then, after it had cured, it could be painted/colored. I was asked for more information about that. So, here we go!

Let's start out with the basic fact that Resinesense, once cured is a nonporous surface. It is a plastic. SO... If you have experience working with inks and paints, you probably have some ideas of what that means. Some things will adhere to it, some won't. 

Let's take a look at some of the things that work best, and the properties they have, shall we?

1. Alcohol inks.  
Alcohol inks will work well on the nonporous surface! That is what they specialize in! 
 The are translucent, except for the metallic mixatives. You can apply these by dripping the ink on or using a felt blender. There is also a clear blending fluid that you can use to get remove unwanted ink, blend the ink,  and get all kinds of fun marbled effects. Multiple tutorials could and have been done (by others) on techniques with these inks alone!

For this one I used the Gold mixative with Currant alcohol ink, and I applied it with a felt blender. Because I used a felt blender, little ink got in the indentations of the piece, making the details pop.

 2. Permanent marker
This really goes along with alcohol inks as they are both a solvent ink. They too are generally translucent, and you will recognize them by the fact that they have a "smell". Sharpies and Bic Mark-its are the office supply varieties.  There are a lot of craft/art alcohol markers on the market including Spectrum Noir, and Copic... neither of which I have. So, Mark-it for me. :)

Because it is a marker, the ink goes into all the crevices. Depending on your project, that may be perfect for you. You could get some really neat effects if you took the time to use multiple markers and really highlight or color in the details!

3. Creative Inspirations Paint (of course!)
Now we are getting into a little trickier territory.  I suggest prepping your piece with either white or clear gesso to help give it a little tooth.

Because these are water based, they are somewhat transparent. If you want the color to light colors to really pop, I suggest a base of white gesso. 

It really does look good all sparkly and painted!  

Again, you can paint it all one color, or take your time with the details... all up to you and your project's needs!

It is true, however, that it will scratch of... ok, more like you can RUB it off if you rub too hard. Makes for nice distressing! 

*keep reading for a tip on this!*

4. Acrylic paints
You know these. They will be opaque. Again, if you are having trouble with them adhering, a prep of gesso helps.

Pretty self explanatory, so I thought I would share a fun tip... Try using your finger to rub a darker (or lighter) color paint into the indentations to make them pop.

Just like the CI paint, this too will scratch off. 

5. Solvant ink pads 
Yes, you can stamp on these! Just make sure you are using a solvent ink pad... Staz-On or Ranger's Archival Ink are the two I'm familiar with. 

*Ok.. So you decided to go with paint, and you have distressed it (or not) and now you want to make sure it doesn't keep scratching off.
Seal it. Use a sealant such a Mod Podge. 

This isn't a perfect fix, but it does make it a whole lot more durable. I had to actually use my fingernail to try to scratch it. If I find a better sealant, I will be sure to pass it on... and if you find one, I want to hear about it!!!

Now, I'm not saying this is a complete list! This is just a very basic list to get you started. Explore. Try things out!

And remember, this is just one of SO many ways to use Resinesence! I'm so excited to be sharing this adventure with all of you!

Enjoy!

PS: I would LOVE to hear YOUR questions! If there is something you want to know or learn, let me know! 

Thursday, June 6, 2013

Cherish..

Hi everyone today's post is about Cherish.  What does the word mean to you? 
  • Each and every moment with loved ones and friends for you never know when it will be gone
  • All the friends you have met along the way
  • Life itself - stop to smell the roses
  • Memories by capturing all those special moments through  a picture
I made this wall plaque and added some flowers to it where and hung it in my daughters room because she tends to forget the word Cherish often!
 
I used all these fabulous colors.


Wednesday, June 5, 2013

Father's Day Card using the New Resinesence!


                                         Happy Wednesday!
             Today I have a fun Father's Day card I created for our
             daughter to give to her dad!
             CIP Blog challenge this month is Inspired by Father's Day!
             I used the new CIP product called Resinesence!
             It is a UV curing resin that is sold in a 2oz bottle!
             More info below!
             This product is so versatile because you can make so
             many different projects with the Resin! I'm sure you have seen
             some of the projects the DT team has been sharing last month!
             What's amazing about this Resin is the quick curing time!
             I set it out in the sun and after 20 minutes the Resin is cured!
             I'm not sure if the curing time is longer for weather
 that may not be as warm?  This curing time for me is when it is
 80 and 85 outside! I will give you a little tip I used Creative Inspirations Paint on the back side of my letters and heart. When I added the letters to the card I used glue dots on the back side. I realized I forgot to add the you to my card so I tried moving the letters down to add the you and I had the paint come off the back of one of my letters.  I then had to raise the heart up because I did not want to try moving the rest of the letters.
My suggestion add the glue dots to the paper and not to the back side of the project you create. For the heart I used CI paint Rustic Red, and for the letters I used CI Paint Tanzanite. For the embossed paper I used Beige.
I added a little bit of Resplendence Angel Dust to the center of the D's! A simple and fun card and this would make a fun project for the kids at home for the Summer!


I used play dough plastic molding toys for play dough! Allow the kids to pick out their favorite mold and have a adult pour the resin in and once its cure allow them to create and have some fun!  Add a little bit of oil to the molding inside edges so the resin will come out a little easier. I use olive oil but any cooking oil or baby oil will work but don't use a lot just a tiny bit.
Poor the Resin slowly into the molds and use a toothpick if you get any bubbles.
After the Resin is cure I used a toothpick or sharp item with a point to scrap to the inside edge and then it get loose and you can slip it out.
You can also add some glue to the front or back side and add some glitter or decorate with markers! I have tried Faber-Castell Big brush markers not sure which other ones will work well with the Resinesence?
Check back in on Saturdays to learn more about how to create with this amazing new product! Kassi our amazing technique instructor for CI paints will be sharing some projects with using this new product! She shares techniques & tutorials twice a month on Saturdays!
Here's the color's I used!


The amazing Resinesence!
 
 
UV curing resin available in a 2oz bottle.

Make your own jewelry or paper craft embellishments in a matter of minutes.

No Mixing, just pour and expose!
Clear non-yellowing formula.
This product is available in the US only

Don't forget if you want a chance to win the new product, some CI Paints, embossing powder or glitters we have a Blog Hop going on until June 7th!
Genuinely Jane Studios also has an amazing Giveaway too!
Thanks for visiting the CIP blog today!
Michelle

Tuesday, June 4, 2013

Some Birdy Loves You!


Hello everyone, Cheryl here today to share a Pocket Easel Card I made for Creative Inspiration Paints, using the Beautiful Shimmery Paints, and Embossing Powder.


I used Buttercup and Royal Blue CIP's on my CottageCutz flowers. For the Birdcage I used the beautiful Deliquesce Gold Crystal. My card is a pocket Easel card, and in the photo below you can see the tag for the pocket, I call that a Hidden Message  area. That way when people  are looking at your card they dont have to see all the writing :)

Creative Inspiration Paints, has some NEW Beautiful Glitters out, and you can find those HERE


I love the bright cheery colors on this card!! The ribbons, Laces and Buttons are from Really Reasonable Ribbon, and all die cutz are CottageCutz dies. 


Thank you for looking and have a lovely day!!
Hugs to all,
Cheryl

Monday, June 3, 2013

CI and GJS Blog Hop

Welcome to the Genuinely Jane Stuios and Creative Inspirations Paint Blog Hop! 

We are so excited to be teaming up with GJS today for an amazing blog hop!

Genuinely Jane Studios manufactures small and medium size wood mini-albums for mixed media, scrapbooking and altered art in many shapes and sizes. All of the albums are hand made right on site in their Central Missouri facility. In addition to their albums, they also carry other art supplies in their online store.

GJS has began to carry CI products!!  

--------------

All of the designers from both teams have joined together to show you what can be created using the albums and paint! Be sure to check both the Genuinely Jane Studios and Creative Inspirations Paint websites to see all of the wonderful products!


There is some great prizes being offered by both us and GJS!

GJS - Gift Certificate for Wood Albums valued at $25
CIP - 5 Paints, 5 Glitters or Embossing Powders and 1 Bottle of our NEW Resinesence

How to Win: 
Leave a comment on all of the blogs in the hop which are listed below...


For an additional entry, Like each of the companies Facebook pages!! While you are there, say hi!


You have until Friday night at Midnight to leave your comments!!

--------------

Happy Hopping!

Your next stop is the talented Lori!!