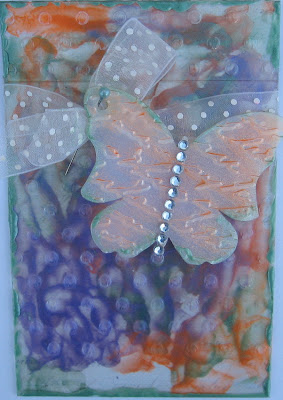
Hello dear painters! Irit is here again and this is my last tutorial for this month as Kassy will be here onece a month with her delicious monthly tutorials.. I will be resting or maybe experimenting with some new exciting technoques.
This time I decided to show you 2 techniques of using Creative Inspirations paints on acrylic pieces.
First one is a clear acrylic piece, painted and then dry embossed and the second one is frosted acrylic piece , first embossed and then painted.The background was done using another great technique, but you have to wait till my next post to see the process, as this technique needs its own tutorial.Or I need a better weather/light for this one.
So here we go!
Products list:
Piece of clear acrylic, I used the inside of this frugal small Ikea frame, but any acrylic piece will do.
Frosted acrylic butterfly (Maya Road), you can also make your own die- cut at home
Embossing plates- you don't need to use the ones I worked with, any embosser will be fine
Creative Inspirations Paints: Lavender, Sage, Mango
Background patterned paper, any delicate kind of it, I used Prima
Ribbon, pin, clear crystals
Step one: This is a background step I am not going to teach this week ,so just mix all 3 paints from the list and add them randomly with a wide brush or your fingers. The great thing with our paints is this waterbased issue, so you can use your fingers and just wash them later. Let the background dry a bit. You can see the texured side you painted, but we will use the backside as we want this project to be smooth.
And here are the paints I used here
Step 2: Adhere the background patterned paper to this piece, painted side on the back, smooth non painted side on the front and dry emboss it as shown.
Step 3: Emboss your butterfly with another embossing plate.
Step 4: Paint the butterfly using some cloth over the embossed areas only, this time we want to see the embossed texture, but make is only over the raised areas.
Use two less seen colors from the three we used for the background. I used Sage and Mango as Lavender was a dominant on the background. Make a thin painted edge with one of the colors around the painted butterfly and then around the whole acrylic piece. Let it dry. Add some crystals over the butterfly.
Make a bow and tie the butterfly using a pin (the hole is there)
You project is done! Enjoy it!
So see you in 2 weeks and then I am going to teach you this background technique. See you!


6 comments:
Fun tutorial Irit, great color combo
Love your tutorial. Great butterfly!
Love the look of the butterfly!
awesome! I love using CI on acrylic!
I always look forward to see your clever ideas!
Great tutorial Irit!
TFS!
Love from France, Kianel.
Post a Comment