Inspirations

Inspirations
The color you see is the color you get!

Monday, September 20, 2010

lickety-split-press-dump-flick...

Guess what everyone.... I's MONDAY! *yes, I realize that for many people this is not cause to celebrate...* Monday, for me, means that I get to hop on here and share a new technique with all of you, and that just makes me happy. =)

For today's Inspiration Monday, I have a technique I came across while experimenting with my stash of stuff... I don't know that it has an official name, so I am hereby naming it "textured stamping". I considered naming it something like "molten matter stamping", or "Lickety-split press-dump-flick stamping" because those names sounded fun, but then my slightly more rational side kicked in and said that those names probably wouldn't catch on....

You will need:
paper (1 to stamp on, and 1 scrap paper)
stamp
cleaned out stamp pad, cut n'dry foam, or makeup wedge
Creative Inspirations Paint (color of your choice)
embossing powder (color of your choice)
heat tool

*please note: like my one name said, all steps of this technique need to be done lickety-split... or in other words, in rapid succession. It helps to have everything open and ready before you start*

Step 1: Load up your clean stamp pad, cut n'dry foam, or makeup wedge with Creative Inspirations Paint.

Step 2: Ink up your stamp with paint. I am using a makeup wedge and Tickled Pink CI paint here. You need a good thick layer of paint, so I use a pouncing motion.

Step 3: Stamp on you project. (sorry, no picture of that one...)

Step 4: QUICKLY move your stamped image onto your scrap paper and dump embossing powder over it. (you don't have to use a scrap paper, but it makes clean up easier)
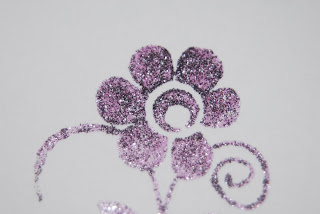
Step 5: GENTLY flick or tap the back of your stamped paper to make loose powders fall off. Because of how quickly the paint dries, you will not get a full coverage of powder... that is part of the charm of this technique. The more you tap, the more powders will fall off, so you can control, to some extent, how much powder you leave on to emboss.

Step 6: Heat emboss as usual.

Here is a sample of what it might look like. I used Tickled Pink CI paint, and black embossing powder. I left quite a bit of powder on the image before embossing. Because the entire image is not covered in embossing powder, you end up with what looks like drops and puddles of melted enamel (hence the "textured" part of the technique.)

Here is another sample. This one is done with Blush CI paint and brown embossing powder. I flicked a lot more off this image, so it is more sparsely textured.

Quick tip: I always stress that you should clean your stamps immediately after stamping with paint so the paint doesn't dry on your stamps. However, with this technique, you don't have time to clean up right away. So... I keep a squirt bottle full of water and a little bit of liquid dish soap, and a soft bristled toothbrush in with my stamping supplies. Squirt your stamp with your soapy water and gently scrub with the toothbrush. This will help get all the paint and shimmer out of even the smallest areas of your stamp. You can then wipe off the soapy mess with a rag, or rinse under running water. I do this with my rubber stamps as well as my clear stamps.

and here is my project highlighting this technique
Paper: Scribble Scrabble, white cardstock
Stamps: Fancy Pants "Fresh Mod", "On a Whimsey", "Doodles and Things", Glitz "Distressing"
Ink: Memento, Mark-it, VersaMagic
CI paint: Emerald
Die Cut: Nestablilities "Label Six"
Other: Pirate Gold embossing powder, ribbon

Here is Mrs. Warty Frog.... *grin* I love the texture on the frog, it just makes it even cuter!

Here you can see that the CI paint shimmers though brilliantly!

Well, I hope this got some of your wheels turning. Give it a try, and share your creations with up by using the link button on our sidebar!

Have a fabulous day!


Thursday, September 16, 2010

book club

Hello everyone!
We are now halfway through September... Schools have started again, the nights are getting colder, and our thoughts turn to indoor activities. And so, I challenged this week's DT to find inspiration in one of their favorite books. And what beautiful creations they have made! Be sure to click on the designer's name to get more details on their projects!


Such fabulous projects! Thanks for sharing with us girls!!!

And thank you to all who sent in applications for our DT call! We got a great response! I have to say, it is going to be VERY hard to choose. Good luck to you all!
~Kassi

Tuesday, September 14, 2010

Tuesday Color Spotlight: Sky Blue

Are you ready for another amazing color? I hope so, because it's Tuesday....so today's Color Spotlight is SKY BLUE!

I created this adorable card a few week's back and thought it would be a nice one to share. I just think this House Mouse stamp is so cute.

I usually always color the flower pink or purple, but for a change I colored it blue!


I first used a prang colored pencil to color in the flower (Gray Blue) and then used CI Paints SKY BLUE to color over the top to give it some shimmer! Isn't it pretty?
I thought I'd start including a picture of the paint inside the cover as well, to show off to all of you!
Here is the paint on white cardstock. Using colored pencils first just makes it a little brighter. But it is fun to just use the paints like this with a waterbrush. The more layers you put on the dark it will also become. This is just one stroke with a paint brush.
When you order your paints, make sure to post a link to your blog in our inlinkz, we'd love to see what you have created!!
Have a wonderful day!
Kendra

Monday, September 13, 2010

aged buttons...

When I was growing up, my mom kept a big jar of buttons in her closet. My sisters and I would spend hours playing with those buttons. I loved looking at all the different sizes, shapes, textures and colors. I loved scooping up handfuls and letting them trickle through my fingers making a musical clinking as they landed back in the jar. And I can't count the number of times we served "Button Soup" to the family.

Perhaps because of that, I have always loved buttons. And, as buttons have become such a popular craft embellishment, I have accumulated my own large jar of random buttons. So, for today's Inspiration Monday, I thought I would show you one way that I alter buttons.

Aged Buttons

You will need:
Buttons *light colors are easier to paint over*
Sticky note
Creative Inspirations Paint *color of your choice*
Crackle Accents by Ranger
Dye ink *I like Distress ink by Ranger*
Makeup wedge
Ink blending tool

Step 1: Pull off a sticky note, and flip it over. There is a strip of temporary adhesive on the back. Stick your buttons onto that. This allows you to hold you buttons without your fingers getting in the way.

Step 2: Using a makeup wedge, apply the Creative Inspirations paint to your button in a pouncing motion.
Step 3: The paint will go on fairly thinly, so you will need to build up a few layers. Allow your button to dry, and pounce on your next layer.

Step 4: Continue adding layers until your button is completely covered and the original color of the button no longer shows through.

Step 5: Let your button dry completely. This is important!

*Crackle Accents by Ranger is the real secret to this technique. *

Step 6: Apply a coat of Crackle Accents to your button. How thick you apply it will determine how small or large your cracks are. I like to apply a nice thick coat for larger cracks, but it is up to you.

Step 7: Let dry NATURALLY. Depending on how thick your coat is, this could take a while. Don't be tempted to speed it up with a heat gun as that will ruin it. *This part is the hardest for me. I HATE waiting! I usually set the buttons aside and work on another project. Because they are on the sticky note, they are easily moved.*

As your button dries, cracks will form. These cracks are random and no two buttons will end up the same. *I love that!*

When your button is completely dry you can add ink. You don't have to do this, but it does add contrast and the cracks show up better.

Step 8: Using an ink blending tool, rub ink into the cracks. This takes a little pressure, so don't be afraid to really work the ink in.

Step 9: Gently wipe the excess ink off of your button with a slightly damp rag.

You will be left with ink only in the cracks like this. When your ink is dry, you are ready to attach it to your project.

Here is the project I did featuring this technique:
Paper: Coredinations, white cardstock
Stamps: Fancy Pants "Doodles and Things", "On a Whimsy", Glitz "Distressing"
Ink: VersaMagic, Distress Ink, Memento
CI paint: Mango
Other: Provo Craft "Polka Dots" embossing folder, ribbon, buttons, Crackle Accents by Ranger

You can see that the shimmer from the CI paints still shows through beautifully.

Here's to having fun with your stash of buttons today!

Thursday, September 9, 2010

focus on color...

Welcome back to another CIDT Thursday post! I challenged this week's team to go Monochromatic as well (after all, there are TONS of colors to go monochrome with... LOL!) Here is what they came up with.... Click on the designer's name to find out more about their fabulous projects!


Good stuff, huh!

Few things worth mentioning....
-The design team call for Oct-Dec is still open... click on the "DT call" tab near the top of this page to get all the details!
-Did you know that Creative Inspirations Paint has a facebook page? Well, we do!. It is still getting up and going, but we would love to have you drop by! You can ask questions, chit chat, post your CI projects, share ideas... Such fun!!! I can't wait to see you there. =)

Have a wonderful day!!!
~Kassi

Tuesday, September 7, 2010

Color Spotlight: Tutu Pink

It’s Tuesday, so that means another color spotlight! This week’s color I’ve chosen is one of my favorites…..Tutu Pink! It’s such a pretty pink!

I love how these cards turn out, they're pretty simple, yet I think very pretty. With summer coming to an end, I thought I'd make one last summery card!
I first stamped the butterfly stamp (SU Stamp Set "Priceless") in the ink color of choice then I lightly dipped my paint brush in the cover of the Tutu Pink paint and then lightly brushed it on the stamp.
Look at the beautiful shimmer in the burrtfly:
I just LOVE it!

I then used a toothpick dipped in the cover of the paint to add shimmer to the dots in the swirls.
Here is "Tutu Pink" on plain white cardstock!

Tutu Pink is a color in my opinion that you just HAVE to have!

I hope you all had a wonderful Labor Day Weekend!

Monday, September 6, 2010

marbling...

Hello everyone!
Happy Monday! I'm here to bring you another Inspiration Monday to help get your creative juices flowing for the week!

Today's technique is Marbling with Creative Inspirations paint... I thought this technique would just be easier to show than to photograph. =)


*I was doing my voiceover late at night (so the phone wouldn't ring, etc) and I said that on the leaf I used Winter White and Antique Silver CI paint.... I actually only used Beige.... oops. =)*
Here is my project...
Paper: Coredinations, white cardstock
Ink: VersaMark, Distress ink
Stamps: Inkadinkado, SEI "Mimosa", Prima
CI paint: Beige
Die cuts: Cricut "Gypsy Wanderings"
Other: rhinestones, ribbon, embossing powder

Have a fabulously sparkly Monday!

Thursday, September 2, 2010

fun with monochrome...

Hello all you sparkling people!
Time to share more amazing projects from the DT! This week, the challenge was to go monochrome... I must say that they did a great job! Due to some server problems or something, I was afraid we wouldn't have all our projects... But, I am glad to say that what ever was wrong, got fixed, so all the projects for this week's team are here! whew!!! I'm glad they are too.... I wouldn't want you to miss out on their talent!

As always, click on the designer's name for more info about their projects.

*make sure to stop by her blog for a fabulous tutorial!!!*


Good stuff, huh!

Just a quick reminder that we are still taking applications for next term's DT. All the details can be found under the tab "DT call" near the top of the blog.

And, if you want to get your hands as colorful and shimmery as the DT, you can find the paints here.

Have a fantastic day!

Wednesday, September 1, 2010

Featured Crafter: Rebecca Goates


Here's another Featured Crafter! :D If you'd like to be a featured crafter, please link your creations using Creative Inspirations Paints to the Inlinkz on our right sidebar.

Without further ado, let's get to know Rebecca:
1. How long have you been stamping? I don't stamp!! Not at all. I don't despise it, it's just not my thing. I have tried it but it doesn't interest me much. I have been scrapping however, since 1998. I started out by making an album of my sorority days and the rest is history. I now have over 10 completed albums and have done hundreds of cards, gifts, altered items and more.
2. How did you get into stamping/card making? I have always been a crafter in some way, shape or form. I started really getting more into my scrapbooking when I found myself 5 months preggo and jobless. Most women nest, but my hubby and I lived in a super tiny apartment and there was only so much I could do, so I started scrapping ahead for my first-born. I went to my first overnight crop when my son was 14 months old and then purchased my Cricut machine a few years later. This is when I started branching out into cards, altered items and just about everything else under the sun.
3. How did you hear about Creative Inspirations Paint? I was browsing the Cricut message boards just like I do just about every day and ran across a post from Marti(pezadoodle) promoting what she called a Blog Truffle. Well I had never heard that word before so I had to check it out. When I won it I emailed her like three times because I didn't believe it was really me! I am also friends with Kendra and when she mentioned she had made the DT I didn't realize at first that what she was showing off was the very thing I had in my possesion. She is what really inspired me to pull out my paints and get busy with them.
4. What's your favorite thing about Creative Inspirations Paint? I love the shimmer, the ease of use and getting messy. The fact that they dry fast is a bonus for me too, because I am super impatient when it comes to my crafting.
5. Is there anything else we should know about you? I love my husband and my children very much. They inspire my creations but they also inspire me to be a better person. I am a child of God and when I am not creating I am singing for my church worship team, volunteering at my kids' school for the Boosters (our version of PTA) or cheering on my hubby and kids in all their sports. I would love it if you stopped by my blog at http://lovelifecrafts.blogspot.com/


Here's a layout Rebecca made to share with us today.