Inspirations

Inspirations
The color you see is the color you get!

Monday, October 18, 2010

Monday Morning Inspiration

How are you liking all this inspiration?  Isn't it fun?!?! 

These paints are truly amazing and there is so much you can do with them!

So I had off last week and found myself in my room daydreaming and having fun with these paints!


 First up is a cute candy corn treat box I made!  I used my Cuttlebug to emboss the cardstock and then used CI Paints Fairy Dust, Mango and Mellow Yellow to alter few of the embossed parts to add some shimmer.  I personally think without the shimmer it was kind of dull! Here is a tutorial to make your own.


 I bought some paper mache letters for my little girl's room and used scrap pieces of paper to cover them.  I used CI Paints to alter the paper to give it some shimmer. Along with altering the paper I added some paper flowers to the letter "A" which were originally white.  Aren't they shimmery?!


 I also made this pretty card for my Grandma's birthday!  I used Tutu Pink, Light Purple and Pink Highlights.  Around the main image I used my doily lace punch to go around it and covered the cardstock with Light Purple to add some shimmer!

Okay, now this was one of my last minute crazy idea!  But this is my last piece of inspiration for today, sorry if I overwhelmed you!  I had taken a picture of some roses from my garden the other day to share on my blog for Breast Cancer Awareness month. 
 As I was uploading it onto my blog, I thought, okay we've been altering paper flowers with these paints, what about real ones!!

So I tried it...
I love the shimmer from these paints!  I actually painted "Peach" onto the rose with a paint brush, as my local Hobby Lobby didn't have any misters for me to spray it on. 

With weddings being on my mind as a good friend of mine is planning her wedding, I just thought how cool this could be to use the paints in this form as well!  They could be used on fake flowers you use in bouquets you have around the house!  These paints would be perfect on those Christmas bouquets to add some shimmer for the holidays!

I thought it was a neat idea!

Have a shimmery Monday and a great rest of the week!

Kendra

Sunday, October 17, 2010

Creative Inspirations Paint: Inspired By...

Thank you so much for all who participated in last week's challenge!

Each week you will be given a challenge to find inspiration in/from what ever the challenge theme is... you can be as literal or abstract in your inspiration as you want... Just make sure you can tie it back to the theme! You will always be able to jump back to the current challenge by clicking the "Current Challenge" link in our sidebar. The rules can always be found by clicking the tab "Challenge Rules" at the top of the page.

This week's challenge is:
Inspired by: one of these things is not like the others

*this is a great compositional technique... having one thing different give focus and visual interest...*

Here is a project to get you started:

I used Tickled Pink Creative Inspirations paint to stamp the pink flower and edge the cream cardstock.

Now it's YOUR turn! I can't wait to see what you come up with!!!


Saturday, October 16, 2010

add a little texture...


Hello everyone! Glad you stopped by for another Creative Saturday Inspirations!
Today I have a quick and simple tutorial for some fun backgrounds using Creative Inspirations Paint. I first saw this technique using Distress ink, but I really LOVE the effect the paint gives.... so much texture and shimmer!!!

You will need:
paper
acrylic block (like you use for stamping)
Creative Inspirations Paint (color of your choice)
paint brush
water mister

Step 1: dab CI paint onto your acrylic block. Don't be afraid to get a nice thick layer.

*variations: brush instead of dab or use a makeup sponge*

Step 2: mist with water.
*the amount of water used will give you different results. Play around with it to get a feel for what look you like*

Step 3: stamp your block onto your paper.

Step 4: carefully remove the block.
You will end up with something like this. (each time it will be unique)

Now, if you want, you can stamp your block again without reapplying paint.

your second image may look something like this....
You can often get a third generation out of it too.

Here I coated the block with Evergreen CI paint. I stamped my paper, then when it was dry, I ran it through my Cricut.

Paper: white cardstock
CI paint: Evergreen
Ink: Mark-it, Powder Puff
Cricut: Gypsy Wanderings
Other: yarn, glitter, Diamond Dust

I love the texture the paint gives the trees! I added a little glitter randomly for the snow (though you can still see the smaller shimmers of the paint....
There are so many ways to vary the look... so have fun with it!!!


Friday, October 15, 2010

Little things inspired layout

Hello friends!  JennK here with you today to share a layout I created inspired by this weeks theme of "Little Things".  The theme got me thinking about all sorts of fun things, but what I decided on, was to focus on the LITTLE things in life that make me happy.  So, a layout war born....

The pictures are from a recent trip my kids and I took to visit my sister over the summer.  I just love to get these little 2X2 pictures printed.  I decided that I wanted to incorporate a few butterflies into the mix so I created a few squares of the same size and then mounted my butterflies to them. 

Here are the paint colors I used in my layout.

I painted the edges of the squares with the Rose Quartz paint...look at the yummy shimmer!!  I also painted the embossed areas of the butterflies.  The easiest way to do this is to leave your butterfly in the die.  Then gently pounce the paint on the open areas, try not to get too much paint otherwise it will bleed under the die.
Here are a few close up of the finished project..


I hope my project inspired some ideas on how to use these yummy paints as well as this week challenge.  
Have a great day and Happy Craftin'!  JennK


Thursday, October 14, 2010

Tiny treasures with Shrink Plastic by Shelly Schmidt

 Hi- Happy Thursday!  I am Shelly Schmidt a returning papercrafter with Creative Inspirations Paint.  For those of you who know me...well, I am long winded!  LOL  My posts are never the shortest....
 I started off my project with an invitation (for dinner):


and here is a close up of the shimmer:


  The image is I Brake for Stamps.   I colored the image with Copics and then highlighted with CI paints Sage, Evergreen, TuTu Pink and Canary.
  I had the idea to make wine glass charms out of shrink plastic using the CI paint.  (They could also be used as accents for a card, for a cell phone charm, etc......)  Then, I thought what a cool idea it would be to try these with Nestability shapes:

 I know this die is available at trade shows from Our Daily Bread- because that is where I got it.   First, I made a ruler (on the Lt ) out of shrink plastic- what began as 2 1/2 inches is now 1 inch- that is how much your project will shrink.  Stamp the image onto the shrink plastic with Stazon. I colored the images strictly with CI paint, punched a hole at the top and then shrunk them with my heat gun. 

I used some CI paint to highlight the edge of the shrink plastic before I added the heat to give the edge some color- they are very sparkly IRL.

I hope you will join in the Creative Inspirations Paint challenges- the current Challenge is Little Things- you do not have to use CI paint for your entry.  We would love to have you join us!
Hope you enjoyed my post today- have a great day!
Shelly

Wednesday, October 13, 2010

"Joyeux Noël"...Merry Christmas

Hello there,
I am so glad to finally come and meet you on the blog of the CIDT! Aren't those paints just amazing???? and those colors...oh my...!!!!
As you may already know it, i am french and may therefore give a little "french touch" to the blog and for my first attempt i made a card saying "Joyeux Noël" which means "merry christmas".
I stamped my image on the paper and then painted it with the creative imagination paint called "chocolate" which is absolutely stunning!!!! This gave my card a little christmas feeling with the shiny look and a very vintage style too.
Then i added some of the gorgeous "autumn wheat" on the brown roses, the cinammon sticks and the lace flower, it fits on every support!!! amazing!!!!
But, enough talk now, here is the card:


Well, i wish you a happy week, french hugs, Kianel.

Tuesday, October 12, 2010

Falling leaves.......

Fall is my favorite time of the year. What's not to love about crisp air, delicious treats made from pumpkin, and crunchy leaves underfoot? There are so many things to do during the months of September and October, and pumpkin picking ranks at the top of my families list. We went several weeks ago to a local farm, and spent about an hour in the pumpkin patch. We brought home thirteen pumpkins and I also managed to get wonderful photographs!

When I come across a photo I really love, I try to fight the urge to scrap it as an 8x10. The reason for that is large photos can be hard to scrap without the page either looking too plain, or too cluttered. The way to get around this is to embellish simply, and try to cluster them directly on your photograph. That is what I did with my favorite shot from our trip. I used Evergreen, Burgandy, Burnt Clay, Buttercup, and Raw Sienna CI paints on chipboard leaves. I just kept brushing the colors over each other, allowing them to blend, for a multi-colored appearance. Just like Mother Nature! Check it out, what do you think??

Monday, October 11, 2010

Chipboard Card


My project today is created using three Creative Inspirations colors: Mocha Latte, Burgundy & Green Olive. I also used a piece of chipboard as my card base, and white cardstock.


My butterfly was created using a "kiss off" technique. I painted a layer of burgundy onto cardstock and then with a CLEAN stamp I quickly pressed the stamp onto the paint. This removes some of the paint, leave a clear impression of your image. It's a favorite technique of mine, because it is subtle. You don't always want a dark stamped image, right? :)


The card base itself is made out of a 5x10 piece of chipboard. I scored it using a craft knife and folded it. I painted the base with Mocha Latte, to make the chipboard seem like it shimmers :)

Sunday, October 10, 2010

Creative Inspirations Paint: Inspired By...

Thank you so much for all who participated in last week's challenge!

Each week you will be given a challenge to find inspiration in/from what ever the challenge theme is... you can be as literal or abstract in your inspiration as you want... Just make sure you can tie it back to the theme! You will always be able to jump back to the current challenge by clicking the "Current Challenge" link in our sidebar. The rules can always be found by clicking the tab "Challenge Rules" at the top of the page.

This week's challenge is:

Inspired by: little things

Here is a project to get you started:

This fun little purse is just the right size to put a few candies or some jewelry in and use as a gift bag. I used Creative Inspirations paint on the flower and the edgings.

Now it's YOUR turn!
I can't wait to see what you all come up with!


Saturday, October 9, 2010

snowy windows...

Hello all you wonderful blog friends! Are you ready for another Creative Saturday Inspirations? I am!

I guess I'm sorta on a "seasonal" kick... This time, it is winter. (as with last week's, this is a project that can be VERY adaptable depending on how you decide to do it!)

Glass Slide

You will need:
Ranger Memory Glass (size is up to you)
Staz-on ink
clear embossing ink
Stamp (I'm using a cute new on from Great Impressions)
white cardstock
Creative Inspirations Paint (color is up to you)
dye ink (I like Distress ink)
embossing powder
Glossy Accents by Ranger
rag
cotton ball
heat tool
tweezers (yup, this one IS important!)

Step 1: Flip your stamp upside down and ink it up with Staz-on. (you want to use Staz-on because it will dry on your glass)

Step 2: Carefully press your glass onto your stamp while it is still upside down. This makes placement easier, and I feel like I have more control. The ink will want to slide on the glass, so be careful to keep it in check!

Step 3: Remove the glass from the stamp, and set it aside to dry. It will take some time, so keep your fingers off, or it will smear!

Step 4: Cut a piece of white cardstock to the size of your glass.

Step 5: Using a cotton ball, randomly dab CI paint onto your cardstock. *thanks Kendra for this idea!* (I am using Winter Frost here)

Step 6: When the paint has dried, use an ink blending tool to rub dye ink over the paper.

Step 7: Take a slightly damp rag and gently wipe the ink off of the paint. The paint will act as a resist, leaving you a fun colorful and shimmery paper.

going back to your glass when it is dry...

Step 8: Press one edge of your glass into your embossing ink. (you want to work one edge at a time to keep things easier.)

Step 9: Dip the glass into a pile of embossing powder.

Warning: This step gets hot FAST! Use the tweezers to hold the glass!

Step 10: Carefully heat the embossing powder on the glass with a heat tool. You need to be very careful while heating the glass. If you do it too fast, the glass will break. Heat it for a few seconds, then take the heat away for a few seconds, then heat again, then take the heat off again... until it is melted. Since the glass gets hot and keeps melting the powder, it doesn't really take that long. (and yes, unfortunately I am speaking from experience here... except it wasn't a small piece of glass... LOL!)

Step 11: repeat steps 8-10 with each remaining side

Step 12: Squeeze some Glossy Accents onto your shimmery paper. (I use Glossy Accents because it is a strong adhesive that works well with non-porus surfaces, and dries clear)

Step 13: Press your glass on top of your paper.

Step 14: Wiggle the glass around to smoosh the Glossy Accents over the entire surface, then align the edges and let dry.

(optional) Step 15: embellish.... I glued tiny rhinestones in the center of each snowflake. You could also add glitter, ribbon, charms.... whatever! Make it your own and have fun with it!
I like to stamp on the glass and put the painted paper behind it, because it really gives it depth... And the shimmer is so gorgeous!
These are fun to use in lots of ways.... You can put them on cards or LOs, you can make them into jewelry, you can make them into ornaments.... So many possibilities for these pretty things!

Now is the part where I show you my finished project.... well... how about a semi-finished project? I made 4 snowflake glass slides, and glued them to the outside of a box.... And yes, when I was taking pictures, it was still drying (hence the little clothes pins LOL!).


Have a fabulous day, and I will be back tomorrow with our next challenge! YAY!
See you then!!

Friday, October 8, 2010

TWO BED TIME STORIES...

Hello Everyone! This is Chris Dickinson here! Welcome to the Creative Inspirations Blog! I am filling in today for the talented Samantha Star, who did not have her paints in time for her first post. 


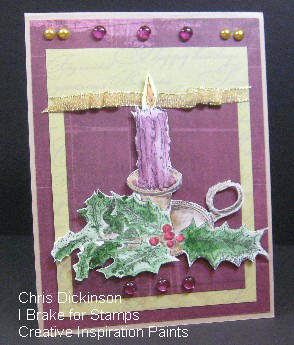
For your viewing pleasure, I have TWO projects for you! Both using the Inspired By Challenge - Bedtime Stories. The first card uses the "Jack Be Quick" and the second card uses "Rudolph the Red-nose Reindeer."   We would LOVE it if you played along too!


My first project uses these dreamy, creamy paints! I have to admit. Once I started painting with them I could not stop. I sat down and painted about 10 images! The only reason I stopped was because it was my bed time. 


 These paints have just the right amount of sparkle to them and are SO easy to use! I started out by grabbing my water color paint brush and Plum and painted the candle.  The flame portion I painted with the Canary, Garnet, Mellow Yellow and Pumpkin and just a touch of plum in the center of the flame.  I used Antique Gold and Gold for the candle holder. The leaves were painted with Emerald and the berries were painted with Garnet and Burgundy for some shading.


You can really see the shimmer of these gorgeous paints on the white card stock before  I cut it out for the card...


For my second card, I used the Denim paint for the back ground of the stamped image. I painted the antlers with the Tan paint. I used the YUMMY Chocolate paint for the reindeer and Garnet for his cute little nose! The Raw Sienna paint was perfect for the stars and I used the Tutu Pink for the inside of his ears.


I hope you enjoyed these projects! Thank you for stopping by and taking a look! Have a GREAT weekend!