Inspirations

Inspirations
The color you see is the color you get!

Saturday, March 10, 2012

stenciled...


Hello all my wonderfully creative friends! 

In honor of the CI & GI blog hop happening this weekend I thought it would be a great time to take a look at using stamps and Creative Inspirations Paint together in a different way....custom stencils!

 ready to play?

(If you are here for the hop, scroll down past this tutorial to get started... don't forget you have until Sunday 8pm EST to enter to win a fabulous prize of 5 jars of CI paint and $25 gift certificate to GI!!!)

Ok, lets get started!


what you need:
StazOn ink
Stamp
acetate sheet
Permanent marker
Craft knife 
Pane of glass (like what you get in a picture frame)
Temporary glue (optional)
Waterproof ink
CI paint
Makeup wedges

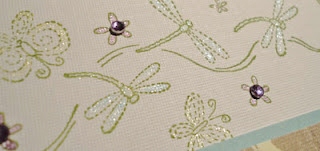
Step 1: Stamp you image onto an acetate sheet. 
I'm using "Simple Elegance" from GI for this

*tip: When you stamp on acetate, sometimes the stamp slides. If that happens, you can "erase" the ink using alcohol based hand sanitizer, and try again.*

Step 2: Use a permanent maker to mark where you want to cut

 Step 3: Use a sharp craft knife to cut out your custom stencil. Use a pane of glass underneath instead of a cutting mat to allow the blade to glide easier.

 Step 4: (optional) cover back of stencil with a temporary adhesive.

 Step 5: (if you did step 4) when glue is dry, pat with your fingers, or clothes to de-sticky it slightly.

 Step 6: Use a waterproof ink to stamp on your project

 Step 7: Aline your stencil over your stamped image

 Step 8: Start applying CI paint using a make up wedge in a pouncing motion

 Step 9: Continue adding and blending the CI paints.
(I've used Sky Blue, Amethyst, Rustic Red, and Fuchsia)

 Step 10: Remove the stencil and store it for the next time.

 Isn't that a fun way to add color and shimmer?

wanna take it to the next level?

Advanced version (or at least the "advanced patience" version):

now that you have the basics down, let's try doing a more complex stencil, or I guess I should say set of stencils.

I made 7 different stencils for this one image.  
Each stencil had different areas cut out.

(I suggest starting by stamping the image on a scrap piece of paper, and mapping out what you want to cut before you start cutting the stencils so you know what you're doing)


The stencils make blending color for individual flowers easy. And after the initial time investment of making the stencils, you have them to use over and over!

Enjoy!

Friday, March 9, 2012

GI + CI Blog Hop

Good morning!

We have a fun surprise for you today!!

We've teamed up with Great Impressions for a blog hop!

Hop along checking out the great designs from both our DT members and GI's DT members!  A great variety of GI stamps will be shared with you along with our fun shimmery paints!

Each blog will have a letter for you to collect that will spell out a special word.  At the end of the hop you will need to leave the word for your chance at winning the special prize. 

The prize will be 5 jars of paint (winner's choice) and a $25.00 gift certificate to Great Impressions!!

--------------------------------------

Great Impressions is celebrating the opening of their on-line store!!

They have a wide variety of great stamps to choose from!  And now you are able to purchase them right from them. 

--------------------------------------

This is one of my most favorite cards I have created using GI stamps!!
Flower Cluster is the main flower image I used!  I just love flowers!!

I used CI Paints Amethyst, Plum abd Lavender to color in the flower cluster with beautiful shimmer!!  Isn't the shimmer amazing?!!

For the top and bottom border, I used Dragonfly Wishes.
I used Sky Blue, Sage, Mellow Yellow and Amethyst to give the stamped image some shimmer.  I used a water brush to paint these colors, to give them more of a subtle color. 

--------------------------------------
Your next stop along this hop is our very own Barbara

But before you leave, make sure to write this letter down:

G

You will have until 8:00 PM EST Sunday to join in our hop for a chance at winning!

Along the way, make sure to leave the designers some love!

Here's a list of the entire blog hop, just in case you get lost along the way:


Thanks for joining in!

Have a great day!!

Kendra

Thursday, March 8, 2012

Bottle decoration - Kianel

Hello dear Creative Inspirations friends,
Kianel here with you today to show you a bottle decoration i made for the last TOMIC challenge.
 I used the embossing powder from Creative Inspirations paints called "platinum" on the 2 butterflies. I so love the result of the color! I added some pearls in the middle of the Cheery Lynn designs butterfly die.

 I also used the paint "autumn wheat" to blend with my distress refills to colour my Magnolia stamp. It doesn't show properly now on the picture (sorry) but it does shimmer.
Wish you a fantastic time playing with those marvellous Creative Inspirations paints products and don't forget our weekly challenge each sunday for a chance to win some fab products!
Take care, love from France, Kianel.

Wednesday, March 7, 2012

Mini Canvas Design

Today My Creative Inspirations Paint project is mini canvas I made after I watched a video  from Jennifer Priest. It made me remember the mini canvas squares I had gotten on clearance a long time back.
I only used two colors from Creative Inspiration Paint-Fairy Dust and  Green.
I used an old sheet of music from some vintage books and then painted them with the paints.
I used a Unity stamp from Marah Johnson that has a great little bird and a second set from Unity for the sentiment "Believe You Can Fly".
I stamped and embossed with clear embossing powder the birdcage image , then stamped the bird on card stock and cut out an attached with pop dots.

My two ribbons are from Really Reasonable ribbon and were attached to the back so these could be hung.
I am sorry I didn't have more angles to share-the sparkle is amazing but was so hard to take a picture of.

post signature

Tuesday, March 6, 2012

All Things Bright and Beautiful

I was playing around with this beautiful doily die from Cheery Lynn and it hit me that this gorgeous die cut would be fabulous painted with the shimmery CI paints. To create the effect I used buttercup, onyx, and pumpking paints. For fun I cut a circular base card from kraft paper. The sentiment is from Our Daily Bread Designs. Believe me, this card really shimmers.
Barbara Washington -- Designer

Monday, March 5, 2012

Happy St. Patrick's Day

I know St. Patrick's Day isn't for another week yet, but I created a St. Patrick's Day card for the first time and wanted to share it!

Yes, as I mentioned this is the first time I have ever created a St. Patrick's Day card!  I guess I just never really got into the holiday.

Anyway, Sweet Stamps had some fun stamps that I wanted to try out, so I combined them with some Creative Inspirations products!

I added Creative Inspirations Paint in Olive Green to the die I used to frame the Happy St. Patrick's Day sentiment. 


In the inside I added this sentiment from the Four Leaf Luck Duo:

Along with this 4-Leaf Clover:
I added some Creative Inspirations Resplendence Glitter in Emerald Green to the outline of the 4-Leaf Clover to add some fun sparkle!!

It's so fun to use these glitters to add a little sparkle to projects! 

Have a great week!!

Kendra


Sunday, March 4, 2012

CI Paints Inspired By: Family


Thanks to all those who joined in last weeks challenge and shared their "Paper Piecing" creations with us!


Check the post below to see the Random.org Top 3!  Also it is the first Sunday of the month, so guess what that means!?!?  We have a WINNER to annouce as well!!


---------------------------------------------
Each week you will be given a challenge to find inspiration in/from what ever the challenge theme is... you can be as literal or abstract in your inspiration as you want....Just make sure you can tie it back to the theme! Challenge closes at 6:00pm Eastern on Saturday.

You will always be able to jump back to the current challenge by clicking the "Current Challenge" link in our sidebar. The rules can always be found by clicking the tab "Challenge Rules" at the top of the page.

You do not need to use the Creative Inspirations Paints in your project, however, if you do, tell us which colors you used, and your name will go in the drawing twice! Each month, one person will win 5 jars of paint in the colors of their choice. The winner will be randomly drawn from all the people who have played that month, so make sure to join in on our challenges each week!
---------------------------------------------

This week's challenge is:

Inspired By: Family


Here's some inspiration:

For this challenge, I was inspired to create a layout of my kids and myself!

I used CI Paint Plum to add shimmer to the word "LOVE".

Kendra

----------------------------


I chose to make this altered box of my daughter. I painted the ugly box and then altered my vine and flowers.

Dawn

When you think of your family, what inspires you?  It could simply be a card to a family member!

Have a great week!  We hope you'll share your creations with us!

---------------------------------------


Random.org Top 3 and Feb. Winner

Thanks to those who joined us last week for our Inspired By: Paper Piecing challenge!  Another week of great projects being shared with us, thanks, we love seeing all your work!

It's the first Sunday of the month, so we have a winner to annouce!!

CI Paints February Winner is..........

CONGRATS!!

If you can just send us an email with your mailing address, and the 5 colors you would like, we'll get your prize out to you: ci.shimmer.paint at gmail dot com

You're welcome to grab this badge for your blog:

------------------------------------------------------------------------


Here are the Random.org Top 3:

Beautiful work ladies!

Thanks for joining us!
You can grab this badge for your blog:

CONGRATS everyone! 

Friday, March 2, 2012

Guest Designer: Jacqueline Hill

Good morning!!  We have another Guest Designer to share with you today!

I'm so excited for you to meet:


I've been lucky enough to get to know her through being on the SweetStamps.com Design Team. 

SweetStamps.com happens to carry Creative Inspirations Paint!!  Next month I'm so excited they will be sponsoring our month long challenges!!  So we'll have an extra prize!  Yay!

Anyway, Jacqueline happens to design some of Sweet Stamps rubber cling stamps!  So not only is she a crafter, she also designs stamps!!  How cool is that!

First off we asked her a few questions to get to know her better:

How long have you been crafting?
As long as I can remember. I've been drawing since I was 3 years old.


How would you describe your style?
Realistic. I love nature and usually tend to use natural colors and draw and craft using natural things, like animals and flowers.

What is your “must-have” paper crafting tool?
So hard to choose. I love my paper piercing tool set. The embossing tool/etching tools, along with the needle piercing tools.

What do you like about Creative Inspirations Paint?
Love love love sparkle! And its so easy to add it over any medium. I use it over marker, colored pencil or just by itself to add a little color and sparkle. And it cleans off my brushes easy.

Favorite CI Paint Color?
Pink! But I use Fairy Dust most, because I can put it anywhere.

About creating her stamp ideas:
I just doodle. Then when I come up with something cute I develop the drawing further. My only problem is, I don't get inspired to draw what people ask me to. I just have to draw what I'm personally in the mood to draw. Thats why I love working with Stacey at Sweet Stamps. She just goes through the drawings that I've done and picks out what she likes.
 
-------------------
 
Here is some wonderful springy cards created by Jacqueline:
 
This card uses some of the Botanical flowers designed by Jacquline last year!

She used some paint to add shimmer to the flowers:


This card was created using a stamp she designed called "Daisy Bunch".

Added some shimmer to the inside of the Daisy's:


Another great flower stamp by her - "Spring Lianthuses".


Another great card:

Just love this added shimmer!
 
What some wonderful creations, Jacqueline, thanks so much for sharing them with us!!
 
-------------------
 
It's so fun to see what other people create using Creative Inspirations Paint!!  If you've created anything, let us know, we'd love to showcase you as well!!

Thursday, March 1, 2012

One of a kind girl with one of a kind products

Hello, my dear painting friends!
Irit is here and this time with some inspiration only, no more tutorials from me .
So here is my first inspirational page and my first time to use Creative Inspirations embossing powders.

This vintage and shabby lo was made with Pion Designs, Prima, A2Z Scraplets and my DN Tamar black and white photo form around her last 12 th B- day.
And adorable girl needs this adorable page.
So here are the ways I used our fantastic paints:
Painting with Spring Green and Evergreen paints over Prima felt leaves. They were black and not a great fit for this mute page, and I also made a few green touches around the leaves too.
Painting and heat embossing the lamp chipboard with Canary paint and  Deliquesce Clear embossing powder for the upper part and using Super Gold Sparkle embossing for the stand. Actually I even tried to stamp over the embossed part with black Stazon, but it became a kind of a texture only, not a pattern.
Painting and heat embossing with Deliquesce  Clear embossing powder the title was  just a fun. In second this bare brown chipboard title was alive and full of pastel( Citrus, Sky Blue, Mint and Blush paints) colors and then shiny  and bright after heat embossing.
Painting the flowers with Frosted White  paint- they were too bright again and I wanted them to be mute, but shiny and CI Paints were just the MUST!

I hope you like this lo as much as I do.
And here are the  products I used here:


Fine Clear embossing powder

Fine white embossing powder
Super Sparkle Gold embossing Powder
See you next time with my other projects.